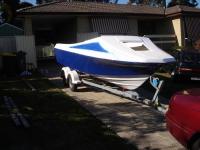
|
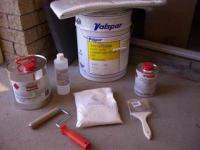
Getting Started. Fiberglass Materials
|
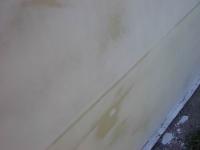
To start today I spent a few hours redoing all my drawings and measurements for the transom and floor. My previous drawings & measurements were all over the place on different pieces of paper so I decided that I would do them again properly and neatly.
I then went up to the local fiberglass supplies shop. I walked out with my wallet $401.07 lighter but I have a whole roll of fiberglass mat, a drum of resin, hardener, talc, acetone, Styrene, woven roving and a roller & brush.
I ran out of time to go to the timber yard but I'll do that on Monday
|
|
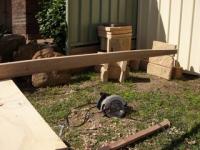
Due to Rugby commitments and the wife being crook I didn't get much done at all on the weekend.
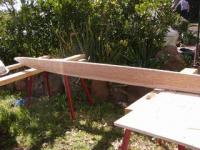
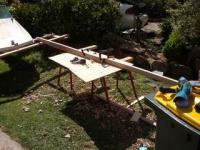
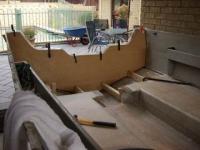
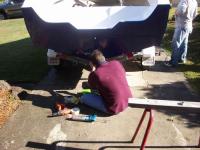
On the keel stringer I went to the timberyard and picked up the raw material for the keel stringer and the back sections of the other stringers I have removed. I was a bit disappointed that the keel was in two pieces not one as I asked for but that's life. Just means I need to fashion a strong joint.
I have fashioned the underside of the back half of the keel stringer. There is no easy way to do this other than plane a bit, dry fit it, get on your hands and knees & look at the underside, mark where the gaps are and plane the high points appropriately. Any voids shouldn't be too much of a problem as the soaked mat will take up most of the space and any gaps can easily be filled with resin as the keel stringer is at the bottom of the 'V' and gravity will be my friend.
The front half of the keel stringer will be much more time consuming to make as the keel curves upwards towards the bow.
|
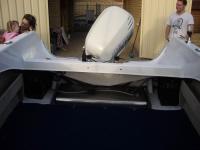
Starting work on the keel stringer
|
|

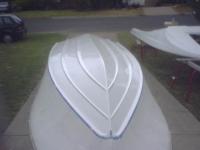
First attempt at fiberglassing
|
Now time for my first ever fiberglassing effort! I was a bit nervous but I have done plenty of reading to compensate for my lack of practical experience. I decided the undersides of my floor panels was a good place to experiment as nobody will ever see them and there's margin for error.
I precut my fiberglass mat and laid my floor sections on sawhorses, got all my tools ready and poured Acetone into a container ready for cleanup. I poured 1.5 litres of resin into a container (thinking this will be plenty) and was about to add the catalyst when I realised I had no mixing stick and for the life of me I couldn't find an appropriate piece of scrap timber (in a panic I ended up using the flat tool you use to undo the flanges on an angle grinder!).
I donned my rubber gloves and eye protection (hardener is nasty stuff) and added my catalyst. I was told by the supplier to add a capful per litre so I added 1.5 capfuls and mixed for around a minute.
I poured some (now catalysed) resin on the timber and brushed it all over. On the first attempt I was a bit stingy with the resin and in retrospect I should have put a thicker coating on. I laid the mat over the wet resin and began wetting the mat through. I was expecting the glass to wet through immediately and was wondering what I was doing wrong. As it turns out it takes a few minutes for the resin to really soak in and this is facilitated by using a fiberglass roller. It was about here I realised I was a good litre short of resin and began to panic. I hurredly mixed another batch thinking I'd completely botched the job but it was no problem at all as the resin I'd already applied was still wet and I just continued where I left off. Anyway after 5 or so minutes the glass was all clear and looking good.
For the second floor piece I over compensated and this time made around 750ml too much resin!!! This time I put much more resin on the wood which then soaked through the underside of the mat and made wetting it through much easier.
I then dumped my tools in Acetone and ran inside to get ready because I was late for Rugby! How time flies when you're fully occupied!
When I got home the resin had cured however the resin was a bit white in colour. I might have been a bit heavyhanded with the hardener or maybe a bit overenthusiastic with the roller??? Anyway it doesn't seem to be a problem as the glass was hard and well adhered to the timber.
The floor sections (which are only 9mm ply) had warped quite a bit but as they are to be screwed into the boat that shouldn't be a problem. Maybe when I glass the top they will 'unwarp'!! Time will tell.
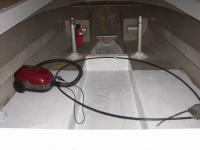
Sunday I made some bridging blocks (supports for the floor sections and screwed them in with stainless self tappers. These are really just to support the floor in the right position as it's installed and the glass will be taking most of the load.
This weekend I won't be doing much work on the boat as it's my daughters 2nd birthday. I have to clean up, go shopping (for beer!) & work in the yard on Saturday before Rugger. Sunday is the party and my brother is down from Port so there will be plenty of beer consumed!
|
|
|
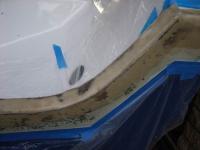
It was at this point I realised I had not taken the drop on the keel at the deepest part of the 'v' into consideration. Basically the timber I bought for the keel stringer is too short. I don't normally make assumptions but in this case I got caught out big time. Anyway I had to get another piece of timber made and I joined the two together with a layer of fiberglass.
|
Miscalculation of required height - Easily fixed
|
|
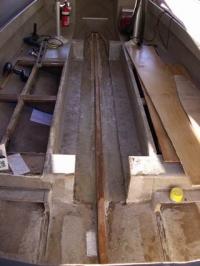
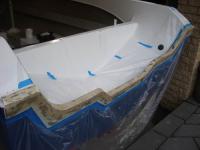
Glassing the stringer in
|
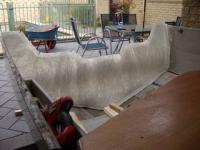
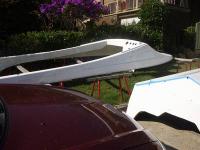
Once the keel stringer was made and fitted snugly along it's entire length I was ready to glass it in.
With any structural component it's vital to ensure that there are no gaps or air pockets as any stress will be concentrated on this area and could result in cracking (at best). Fortunately the keel of the boat is a 'v' shape so I was able to use plenty of resin as it would only pool under the stringer ensuring good contact all the way along.
I cut two thin layers of mat to run under the stringer and these absorbed resin like a sponge also improving the integrity of the join. After cleaning all surfaces with acetone and with the mat wet through I laid the stringer and weighed it down with my next door neighbours weights which I 'borrowed' from his benchpress when he wasn't home.
Once dry I cut 30cm wide strips of mat and dry fitted them so they ran along the bottom of the boat then up the stringer until level with the top. With all my kit ready to go I brewed a batch of resin and strated glassing the stringer in. I used 3 layers of mat and it took around 5 batches of resin to get it all in.
Next I ground all the dags where the mat protruded higher than the top of the stringer.
|
|
|
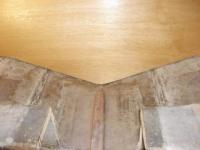
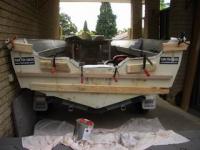
The keel stringer is completed (AT LAST) and ready to be bedded and glassed next weekend. This is the backbone of the boat and as such I've taken alot of time to get it right. I have taken alot of care to ensure it follows the exact contour of the keel which involved taking height measurements every inch for the 5m length of the stringer. I then transposed these measurements onto the timber and cut it out.
|
Keel stringer made
|
|
(Insert New Caption)
|
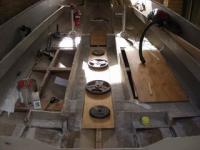
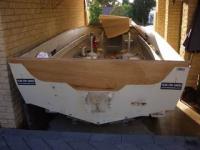
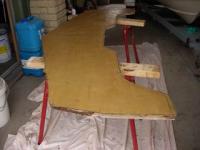
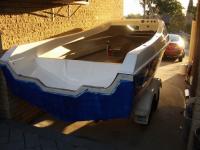
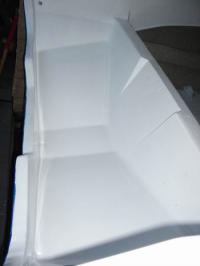
I had already cut out the floor panels so now it's time to fit them.
I started with the centre panels above my newly fitted keel stringer. As you'll remember I ran fiberglass up the sides of the stringer so the top of the stringer is still exposed wood. I cut two strips of mat the width of the stringer and after cleaning all surfaces with acetone I laid the mat along the stringer and wet the mat through. I then carefully positioned the floorboards and weighed them down with my next door neighbour's weights which I have not yet returned.
Next I made a bog from Polyester Resin, Microfibres and Talc and puttied up the gaps around the floor panel. This is mainly to prevent resin from escaping into the bilge when I glass the panel in.
I then pre-cut 4 x layers of mat that fit along the entire width of the floor cavity. I brewed a big batch of resin and glassed the floor panels in, two layers at a time.
|
|
Then I fine tuned the timber. Plane a bit off here. Refit. Plane a bit off there. Refit. etc etc etc.
The keel stringer is in two pieces (i.e. a front and back half) so I fashioned a join approximately 45cm long and glued it with a layer of fiberglass.
|

Fits like a hand in a glove
|
|
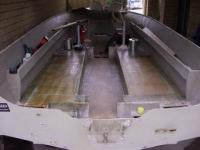
Glassing in side floor panels
|
As before I bogged around the edges, pre-cut my kit and ran 4 x layers of glass over the panels.
As with all my fiberglassing I ground away any gelcoat and cleaned all surfaces with Acetone to ensure a good bond. All timbers were primed with resin diluted 25% with Styrene to improve water resistance. All the floor panels have a layer of fiberglass on the underside meaning the are fully encapsulated.
I weigh 115kg and have jumped (hard) on the floor panels. The real test will be when Joe comes out on my boat!!!
|
|
|
With this dry I repeated the operation with the side floor panels. With these panels I had bridging blocks in place and after running a layer of glass along the tops of the stringers I used stainless screws to secure the panels in place
|
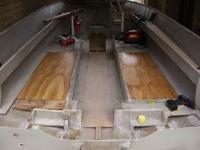
Positioning side floor panels
|
|
Dry Fitting
|
There are two schools of thought when it comes to installing transoms. One is to install one layer of ply at a time, the other is to glue the pieces together outside the boat and install the transom as one piece. I don't claim to know which is the best way and I spent many hours deliberating over this issue. This wa smade more difficult in that the two people advising me (both of whom I respect as foremost authorities on the subject of boat building) take differing views which they staunchly defend. In the end I decided to cut the two pieces out and make my mind up after I had dry fitted them. Hopefully at this point in time the optimal solution would be evident.
My old transom was 12mm thick at the bottom and was reinforced to be 35mm thick at the top. As a result, along the bottom there was a 'seat' where 12mm thick piece of ply dropped in nicely. It is normal practice to install the thickest sheet first (i.e. at the back of the boat) however I decided to break convention to take advantage of where the old piece bedded in and install the thin layer first. I also figured it will be easier to fine tune the thin piece and use this as a template for the thick piece.
The other thing you need to consider is that the transom is not perpendicular to the bottom of the boat. As I don't own a protractor I cut a piece of paper at the angle the floor meets the transom. I then set the circular saw at that angle which was 17 degrees off perpendicular.
I traced out the template on the thin piece of plywood. I cut along the bottom of the transom at the abovementioned angle and cut the sides at 90 degrees. In the corners and where I couldn't get the circular saw into I finished the cuts with the jigsaw. I left esxcess timber along the top of the transom as I would trace the top of the existing transom skin later so it is exact.
I then attempted my first dry fit. The ply was too wide and deep in places so I marked the high points and planed them off. Each time the transom fitted a bit better and after a couple of hours of patient work and around 8-10 dry fittings I was happy. It is VERY important to round off the back edge of the transom to allow it to fit snugly. A square edge WILL leave gaps.
I used the thin ply as a template for the thick ply and cut it out, again with the offset angle on the bottom. I repeated the dry fitting and fine tuning exercise although this time most of the hard work was done and it only took a few fittings to get it right. My theory that it would be easier to fine tune the thin timber was proven correct as lugging the thick piece out of the boat was bloody hard work as it weighed a ton.
Now it is time to evaluate which fitting method if the best. Both pieces sat perfectly flat together so i elected to assemble them outside the boat and install the transom as one piece.
To ensure the two pieces stayed perfectly alligned banged a couple of self tappers in the part of the transom that would be cut off later before removing it from the boat. I laid the two sheets (screwed together) on sawhorses (this took a helper as it was BLOODY HEAVY) and before I removed the screws I drilled a couple of 8mm holes (again in the waste timber) into which I dropped a couple of screwdrivers. This way I can always reallign the pieces perfectly.
|
|
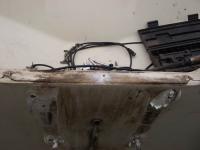
With the dry fitting completed it's time to install the transom. To get an idea of what's involved with this you need to remember that the weather is getting hotter and that resin (depending on the ration of catalyst used) can start to go off in 15 minutes. This means you have to be ORGANISED, plan everything, do a 'dry run' and not discover any surprises halfway through or you're stuffed. You need to make the right amount of resin up as there is no time to duck off and brew another pot and theres certainly no toilet, beer or other breaks until afterwards.
In preparation I cut two sheets of glass mat with excess at the sides the thickness of the transom. This mat goes between the transom and the back skin as well as under the bottom and sides of the transom. When installing a transom you CANNOT have any voids, gaps or air holes anywhere which means the transom has to be clamped in at the top, middle and bottom. Along the top I used 8 x clamps with pieces of scrap timber to spread the compression over a wider area. In the middle I screwed two pieces of timber into the existing holes (motor, tow hook and drain) in the transom skin (the holes haven't been drilled in the transom timber yet but the old holes are still in the transom skin). Along the bottom I braced the transom in using pieces of timber cut at angles to act as a wedge.
Before I started I taped up all the transom skin holes with masking tape. I then did a dry run which might sound dumb but as I mentioned, you have no time for things to go wrong. As it turns out the dry run revealed my clamps were not properly adjusted to the right width and my battery drill has a low battery (this would have been a disaster) and I'd misplaced my hammer which I needed for wedbing in the braces.
With everything ready and the two sheets of mat in place I brewed a full pot of resin. I did not kick it too hot as I wanted to buy myself as miuch time as possible plus it was a hot day (which makes resin go off faster). I peeled back the mat sheets half way on one side and wet the inner transom skin. I then laid one mat sheet down and wet it through. I laid th sedond sheet on top of the alrady wet sheet and ran the radius roller over it before shifting to the other side.
|
The install begins!
|
|
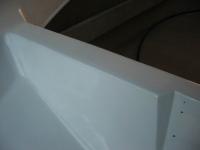
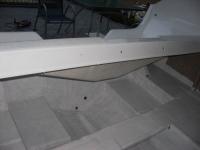
A good fit
|
The only way to get a fit this good is to fit the transom, mark the high spots, shave a bit off here, shave a but off there and refit. Repeat this process 15 times and you'll have a snug fit with no gaps.
|
|
Of all the jobs in this project, the transom is the one which I was most concerned with getting right. I'm not an engineer but I think it's obvious that this part of the boat structure is subject to enormous forces and is worth spending the extra time to get a perfect job.
First of all I made a template out of cardboard which my fiberglass supplier gave me. As a starting point I traced the template with the fiberglass pieces I managed to peel off whole from the old transom. I then fitted the template to the boat and trimmed a bit off here and there to make it as close to a perfect fit as I could. On one side the template was a bit short so I had to tape an extra piece of cardboard on the side and trim it back to fit.
The transom is made from two layers of plywood, 19mm and 12mm making a total of 31mm. The old transom was 35mm thick however I have to allow for the layers of fiberglass which I use to laminate the timbers together and to the boat. The transom CANNOT be thicker than the original or the deck won't fit back on so you are better off being a mm or so thinner than too thick.
I laid my ply on sawhorses and brewed a misture of poluester resin and 25% styrene. This thins the resin down and allows it to penetrate the timber improving it's water resistance and bonding qualities. You don't need to make too much of this resin up (as I found out) and a little goes a long way. I painted both sides of the plywood sheets and allowed them to dry.
|

Measuring and cutting out the transom
|
|
Laminating and glassing the inside skin
|
I cut a piece of mat to sandwich between the two pieces. I cleaned both surfaces with acetone and wet one piece of timber with resin. I then positioned the mat on the wet timber and carefully laid the top piece on (making sure it's the right way up and the base angles match). I rammed the screwdrivers into the allignment holes and drove the screws back into their existing holes. I then clamped the pieces together with 8 clamps and I also drilled numerous screws through to pull the timbers togther and ensure no air cavities. In all cases I clamped / screwed just tight enough so that resin and mat oozed out to the edges. The result is two pieces of ply perfectly glued together.
I then cut another piece of mat and applied this to the 'front' surface to the transom and ground off all the dags and runs from the fiberglassing work. The two clices has shifted ever so slightly in the laminating process so i had to do a bit of planing to once again get that perfect fit.
Once I had the perfect fit I traced along the top edge of the transom skin and cut the excess timber off. Again I finished the cuts with a jigsaw along the curves and there the curcular saw blade couldn't reach.
Now to install the new transom . . . . . .
|
|
|
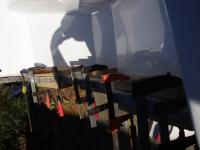
I then clamped (my already adjusted) clamps along the top and then drove a couple of (pre positioned) self tappers through the timbers.
|
Clamping
|
|

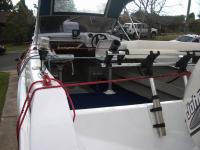
Bracing using the stringers and wedges
|
It was here when things came acropper. As this is a big job my resin pot was full to the top plus I was hurrying and when I lifted my brush out of the pot it flicked a blob of resin right into my eye. For those that don't know, polyester resin is not nice stuff, but nowhere as bad as the hardener which is Methyl Ethyl Ketone Peroxide. In summary getting this in your eyes is BAD. Really bad, even at 1% dilution. The millisecond I felt it hit my eye I straight away knew I was in trouble. A second later the burning started and I dropped everything and dashed over to my swimming pool and laid down on my stomach and dunked my head in the water. I used my finger to rub my eye, including under the eyelid (fortunately I've played in the front row for 25 years and had a few fingers in my eyes so it's not an altogether unfamiliar sensation!). I came up for breath and there was still some stinging so I dunked my head again. This time the stinging had stopped. Due to my quick action (and a pool being 5m away) I was luck enough to be ok so I dried myself on a rag and jumpoed back into the boat and kept going.
Fiberglass mat will soak up an amazing amount of resin, it's like a sponge and I kept slopping it in as you want the glass to be as thick as possible in this instance. When the glass was saturated I carefully maneouvered the transom timber and dropped it in place.
Now for clamping and bracing. I started by tapping the top of the transom with a happer to ensure it was bedded right in. You can see bythe pictures, the braces inside the boat I cut at an angle on one end and I was able to hammer in blocks between the braces and the stringer ends whech gets a really solid result.
|
|
PHEW!!!!!!!!!!!!!!!!!!!!!!!!!!!
That was (albeit organised) pandamonium!!!!!
|
Another shot - from inside
|
|
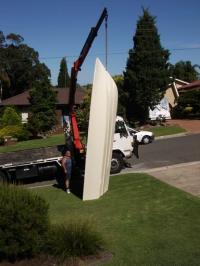
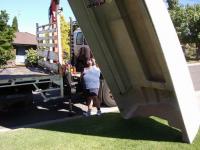
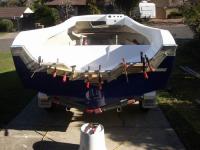
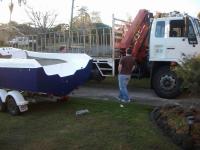
You've always wondered how to flip a hull upside-down haven't you!
|
My mate Joe came and helped me flip the hull over. It ended up being pretty simple. We hooked the crane to the eye and lifted it up endways. We couldn'y do it sideways because I reckon it would have placed too much load on the fiberglass gunwales.
|
|
. . . except drinking these and watching cricket!!!!
We now jump ahead to March 06
|

3 Months of Doing Nothing . . .
|
|
Filling
|
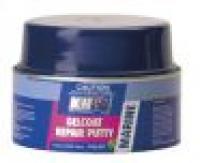
All dents, gouges and scrapes were filled with putty. The trick is to remove all the damaged gelcoat and sand the area out with coarse paper. Then clean and fill with putty, ensuring you overfill so that it will sand back flush with the surface.
|
|
|
|
Loweing the hull down
|
|
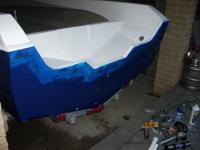
Painting - Another fun job!
|
Painting is one of those jobs. It sucks however it is the single biggest contributor to how good the boat will look when it's done.
As far as I know there are two options. Get it sprayed professionally or DIY with a roller & brush. After much deliberation I decided to have a crack at it myself. I've done the rest of the project with little or no practical experience so why change now??!!
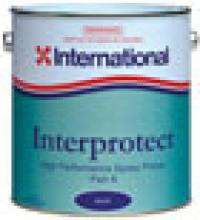
First came the primer and I went for the International Interprotect two pack. Basically you mix it a 3-1 and roll it on. It's viscous and goes on quite thick. After 2 coats I sanded it back and then went another two coats before sanding it back again.
When sanding I used a random orbital and I found 400 grit was too fine to start with. I ended up using 220 grit to smooth it out and went over it again with 400 to finish it.
|
|
Excuse my crap Photoshop skills!
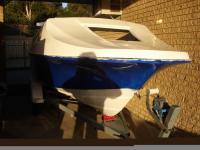
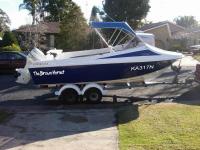
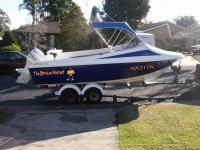
White undersides & deck with blue gunwales
|
Colour Scheme Option 1
|
|
Colour Scheme Option 2
|
The same as option 1 but with a black rubrail & rego numbers
|
|
If you look really closely you can see when the finish is perfectly smooth. You have to ensure every square centimetre is perfect and I mean no blemishes or roller marks at all.
By the time I'd finished the surface was as smooth as gelcoat but all the minute blemishes and pinholes were filled.
|
Priming
|
|
First Topcoat
|
Well I thought all the marketing for the International product was crap. I was completely, categorically, totally wrong!
The topcoat finish using the Newport product was not good. Admitedly the clouds did miraculously part and the sun came out while I was painting (which I'm sure didn't help) but nonetheless the brush marks stayed and I had to sand it all back again.
I went to the shop and purchased the International Perfection undercoat ($180 ouch) and applied a coat. What an awesome product. There are some faint brush marks but the undercoat will be lightly sanded when I fihish so they will be removed.
I usd the softest and finest brush I could find and for the topcoat I'm going to try a badger hair brush (poor bloody badger . . . ) and see if that eliminates the brush marks altogether.
First moral of the story - Listen to the experts
Second moral of the story - Don't experiment on a hunch when you have no factual information to base your idea
Third moral of the story - You pay for what you get
Anyway this picture is with the International paint and the result is AWESOME!
|
|
In Australia there seems to be two makes of boat paint readily available. Newport (by Wattyl) and International. Newport is cheaper but the International product is very well marketed for the DIY'er. I was committed to the International product when at the last minute I decided to give the Product Manager at Wattyl a call and get the lowdown on their product as it is Australian plus much less expensive.
The International product is able to be applied with a roller and brush where you roll the pain on and 'tip it off' by dragging a brush over the wet paint. The Wattly bloke told me the Newport paint should work the same but it's never been formally tested.
Never backing down from a challenge I decided I'd give it a go. I’ll start with the undersides which is not so visible and if it doesn’t work I’ll sand it back and get it sprayed!
The bottom of the hull (not the deck) in this picture has it's first coat of topcoat!
|
Topcoat Phase 1
|
|
Hull flipped and first topcoat
|
With the underside painted it's time to flip the hull. Again my mate Joe (and his crane) helped and the boat is now back on the trailer. I even dropped the deck on top and it is starting to look like a boat again.
We hooked the crane to the towing eye and hoisted the boat to a vertical position. It's strange to see 17' of hull dangling from a crane and I was hoping the towing eye was going to be strong enough! There was a hairy moment as the boat tipped past vertical but some expert cranework by Joe kept things under control as we lowered the boat onto the trailer strategically positioned underneath.
I replaced my trailer rollers with red fiberglass rollers as the old black ones would have left black marks on the nice new white bum.
|
|
|
Now the new red rollers are slightly smaller in diameter than the old black ones meaning I need to readjust the wobble roller brackets otherwise some of the rollers don't support the hull. That's easy except I snapped one bolt off the bracket holding the roller stem meaning it was stuck. I ended up having to hacksaw off the old bracket (and cut through a galvanised bolt as well) and mount a new bracket. Three hours later and it's all done!
|
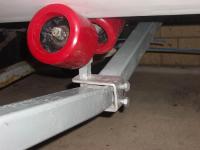
Trailer Roller Problems
|
|
Anti-Skid 2
|
I used International Interdeck which are particles you can add to paint or sprinkle over the top. I still had some of the Newport 2 pack topcoat (the paint I didn't like earlier) and mixed a batch of paint and added the grit. I tried rolling the paint on but it didn't work as the grit tended to be pushed by the roller into the corners and edges. After some experimentation I discovered the best way was using a brush and 'dabbing' it on.
|
|
|
Two more coats of blue and another coat of white and that's the majority of the painting done. The finish is ok but there are too many brush marks for my liking and I still am going to have to cut and polish, despite International claiming this is unnecessary.
|
More top coats
|
|
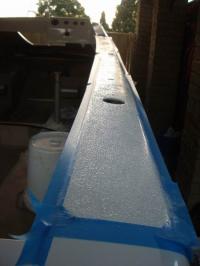
Anti-Skid 1
|
Today I applied anti skid. The time consuming part was masking, in particular the corners where I found the best method to be to tape them up and use a circular object (such as a lid) of the right radius and cut around it with a razor blade.
|
|
|
The finished result was not great so once the coat was semi-dry I mixed another batch of paint only (no grit) and dabbed it over the top. This was much better and did not look so grainy. When I removed the tape I was really happy with the result.
|
Anti-Skid 3
|
|
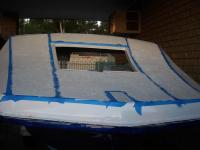
Deck Back On 2
|
Another view of the clamping
|
|
|
I sanded the transom back to remove the resin wax and cleaned up the back of the deck. I mixed epoxy glue and (after dry fitting the deck) coated the join of the splashwell and transom with epoxy before carefully repositioning the deck back in plave and clamping it.
|
Deck Back On 1
|
|
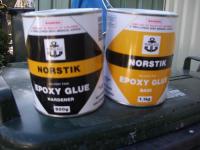
2 Part Epoxy Glue
|
$80 farken dollars worth!
|
|
|
Overall I'm pretty happy with how it all went
|
Deck Completely Refastened
|
|
Deck Back On 3
|
I put Epoxy along the flange joint at the deck/hull join, lowered the deck and secured the deck in place with stainles screws. To pull the two parts together I used long screws which I later cut the tails off with a grinder. For the rest I used small screws that only just poked their heads through the underside of the join.
I managed to scratch my beautiful paintwork with the chuck of the drill in a few places. Another job added to the list.
The plastic you can see is just a dropsheet as I still have a few coats of blue to go.
|
|
In a few spots I had a gap between the splashwell and the transom. To fill this I first climbed under the splashwell (there's not much room under there, especially for a bloke my size) and glassed some mat under the join. For those who haven't done much fiberglassing, glassing the underside of things is not easy as gravity is not working in your favour and getting started is difficult as you need to hold the mat in place while trying to wet it through. Furthermore resin tends to drip down on you just to add to the experience.
When the glass hardened I made a batch of bondo from polyester resin & microspheres and bogged up the top of the transom and filled any gaps at the join. When this hardened I sanded it flat (that stuff is a DREAM to sand!) and the result was great.
I could have left it at this (many boats are) but I believe bog will crack (look down two photos at the transom under the motor when I took the trim off). I therefore fiberglassed the whole lot together. This will be alot more work as I'll need to feather the glass but I'll be 100% confident that the joint will stand up to anything.
|
Deck Glassed to Transom
|
|
Another Picture of the Join
|
I was pretty fastidious with drop sheets but I'll tell you it's no coincidence that my best glassing work is done when I don't have to worry about containing runs and can devote my concentration to the job at hand.
Resin is hard stuff and hand sanding a run out of an awkward corner is no fun at all, not to mention an hour of wasted time.
Yeah . . . 10 minutes to tape in drop sheets was a good idea!
|
|
Just a reminder why bog is not a good finishing product and why I took the time to glass over the joint. To make matters worse this cracking was under aluminium trim so it went unnoticed PLUS this part of the transom gets dunked underwater all the time. A great example of 'out of mind, out of sight' but with dire consequences.
I suppose the point is that I never have to worry about this happening because I've done the job properly.
|
A Case In point . . . .
|
|
Painting wet areas
|
I painted the wet areas and bare fiberglass with kleftover topcoat to improve the water resistance and appearance.
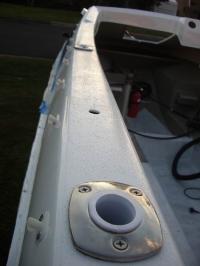
The second hole you see is the inlet for the live bait tank and it will have a stainless skin fitting there.
|
|
I spent a considerable amount of time sanding the glass over the transom before bogging it over with a putty of microspheres and sanding it again. I painted it with primer and wasn't happy with the feathering so I sanded it again.
The light colour at the top of the transom is because it only has one coat for the top 6"
|
Sanding and painting
|
|
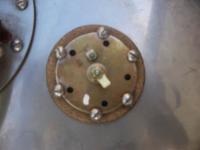
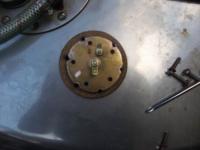
Fuel sender fixed
|
A great result. Thanks Joe!
|
|
|
A floor panel and carpet will cover this.
|
Painting wet areas 2
|
|
Inside the splashwell
|
I repainted inside the back of the splashwell. The top of the transom will be covered with an aluminium trim.
|
|
The fuel sender flange was not compatible with the standard hole in the cruisetank. I was thinking I was going to have to cut a new hole when my mate Joe had a brilliant burst of lateral thinking.
We positioned the original cork gasket and a rubber gasket under the flange. We then ground notches out of the flange so the existing screws would snugly fit against the flange and hold it in place with a perfect seal.
|
Fuel sender problems
|
|

Almost there . . .
|
Still a few odd jobs to do but she's starting to look like a boat again.
|
|
|
Controls mounted. This ended up being a relatively painless task.
|
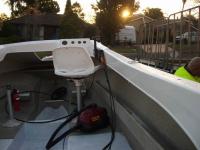
Fitout 2
|
|
Fitout 3
|
Joe's truck getting in position so we can use the crane to mount the motor. We are quickly running out of daylight!
|
|
|
This week has been very busy. Jimbo pictured working on the bungs and skin fittings
|
Fitout
|
|
Fitout 5
|
Rod holders fitted. This is a classic example of an easy job being anything but. The holes from the old rod holders had to be widened to suit the new ones, a job that took several hours. The best technique was to nibble the holes out with the edge of a drill bit.
|
|
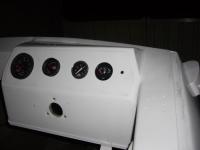
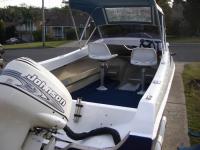
Gauges fitted, wired and WORKING!
Actually I cheated and got a mechanic to wire up the gauges and reconnect the motor controls. It was money well spent.
|
Fitout 6
|
|

Fitout 4
|
Aluminium trim & motor mounted. The mentally defective retarded spastics at Bias sold me black Sikaflex labelled as white but I had to get the motor mounted tonight which meant we had to fit the trim tonight so we went ahead using the black and it does not look great unfortunately.
|
|
You can see the fuel tank and the batteries in their boxes.
The carpet is held in with press studs so I can remove it for cleaning.
|
View looking back to the stern
|
|
View from the stern
|
(Insert New Description)
|
|
|
I put in new steering and you can see the switch panel in this shot too.
|
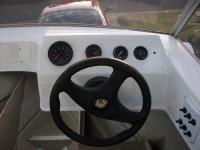
The dash
|
|
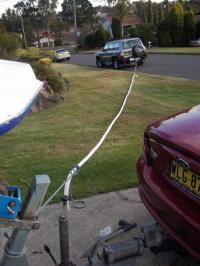
How to get the coil memory out of a gunwale moulding
|
It worked too!
|
|
What a cow of a job this is. I hated every second of it. It's the middle of winter and the moulding is hard as steel and it has alot of memory from being coiled. It took me all morning to get the moulding seated on the flange and it was backbreaking doing it by myself.
The basic procedure was to get a foot ot so on the flange by heating it with a hair dryer. When you go to do the next bit, the bit you've just done invariable falls off followed by me uttering every expletive in the dictionary of four letter words.
|
Installing the gunwale moulding
|
|
(Insert New Caption)
|
(Insert New Description)
|
|
I let the moulding sit for a few hours to 'take' to being on the boat. I then removed it and put a good squirt of Sika in the moulding and along the top of the flange. I then (with the help of my wonderful wife) I put the moulding back on.
Because the mouding was coiled, it would come away from the gunwale in places. To fix this I tied alot of rope around to get it as close as I could.
|

Installing the gunwale moulding 2
|
|
Installing the gunwale moulding 2
|
Another view
|
|
|
(Insert New Description)
|
(Insert New Caption)
|
|

(Insert New Caption)
|
(Insert New Description)
|
|