|
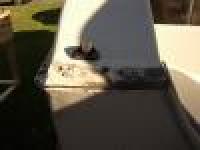
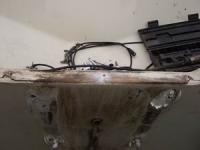
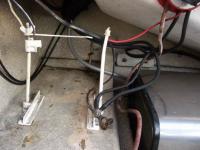
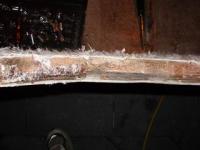
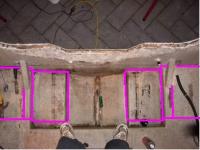
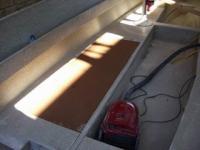
In case anyone was wondering how water was getting in:
|
A pretty good start and I got everything done I had planned.
- Removed wiring for peripheral devices (sounder, stereo etc)
- Removed speakers
- Removed rod holders, cleats etc
- Removed canopy
- Removed battery brackets
- Drained fuel
- Removed the rub rail
- Separated the deck from the hull
Next week I've conned Joe & Jimbo to help remove the motor and top.
|
|
The rubrail was bogged in and I broke it to bits removing it. It was old and hard and stood no chance of surviving!
The flange join was stapled together and to get the staples ou was not easy as they were covered in bog and hard to get to.
|
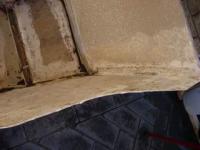
Removing the Rubrail
|
|
Deck Loose
|
With a crowbar, screwdrivers and timber wedges I got the deck loose without too much trouble. This EXCLUDES the rear where the splashwell is glassed to the transom. I haven't got that loose yet!
|
|
|
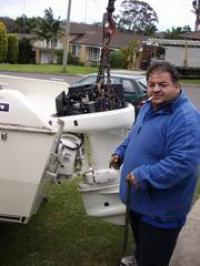
Today with the help of Joe and my next door neighbour we got the motor off.
|
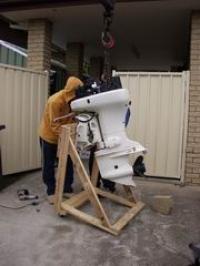
Motor off!
|
|
Trouble with the trim
|
With the motor disconnected we had trouble adjusting the trim as we needed to tilt the motor to get to the bolts. This is my good looking mate Joe who eventually solved the problem.
The boat mechanic that told me how to do it gave me a bum steer and we wasted over an hour buggerising around tracking the wires back to the tilt motor.
|
|
|
Luckily Joe has a crane on his truck. Saved alot of effort!!!
|
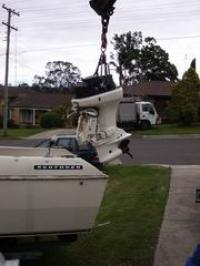
A crane is good!
|
|
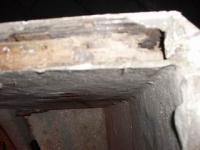
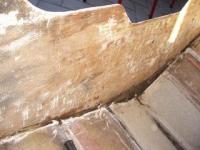
In case anyone was wondering how water was getting in . . . again!
|
Cracks under the aluminium trim.
|
|
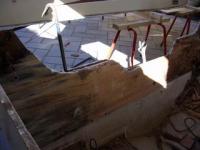
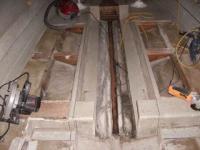
Cutting to separate the deck from the hull at the transom.
I originally cut the deck at the top of the back of the transom however the transom and the deck were well and truly stuck together. Instead I needed to cut what can best be described as the front of the top of the transom with an air chisel which allowed me to drive a normal chisel down between the outboard well and the transom and separate the skins. It was a bit tricky and took a while but we got there in the end.
A jack under the drain aplied pressure and CRACK it separated and there was much rejoycing.
A yell next door attracted some more slave labour and we mahandled the deck onto sawhorses.
|
First cut!
|
|
The *%$$$##* Fuel Tank
|
The Cruisetank was stuck down with a ridiculous amount of Sikaflex thanks to my idiot boat mechanic and would not budge. Shannon if you felt a strange sensation last night it was me swearing at you big time!!! Even two of us holding the outboard well and pushing as hard as we could with our feet could not go close to budging it. We tried crowbars which only dinged the steel. I tried driving a timber wedge in and dinged the stainless even more.
Byron then suggested we get fishing line and use it to cut through the Sikaflex, like a ceramacist uses a string to cut clay. Basically we threaded line behind the tank, (between the tank and the deck) and Byron would pull one side then I'd pull the other. We started with 20lb braid as I thought with it's thinner diameter it would cut better but as we all know, Braid does not have good abrasion resistance and it broke pretty quickly. We reverted to Mono and was able to cut through 6" or so of Sikaflex before it wouldn't get any further.
We then repeated the same principle but this time with rope. We started with thin diameter (just a few mm) and with our third rope (around a half inch) we managed to FINALLY break the seak and get the damn thing out.
A great example of a 2 minute job taking over an hour!!!
|
|
|
This is where I had the jack under the splashwell. Note I put tomber under the jack to spread out the load.
|
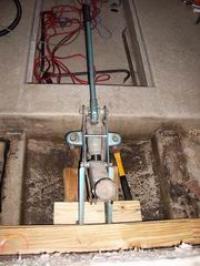
A jack is good to dislodge the deck at the splashwell
|
|
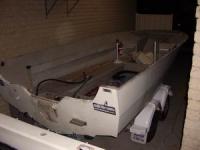
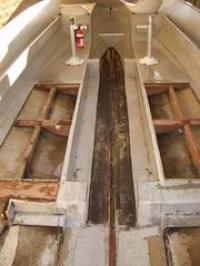
The deck removed!
|
At last!
|
|
|
On sawhorses
|

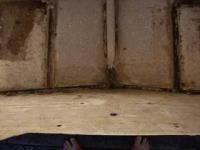
The deck
|
|
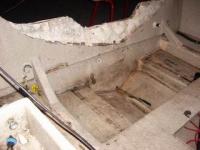
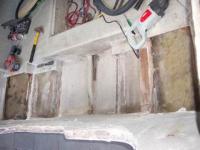
The inside after a cleanup
|
Last night I was able to tick off a few items from my list.
It's amazing what you can get done in just a couple of hours and I must admit that I really look forward to getting home and doing some 'real' work all day, despite the fact it's messy!!!
Last night I cleaned the floor under where the fuel tank was. On removal of the tank I found all sorts of shite including sinkers, hook packets, fishing line, seaweed and the lid from a bucket!!!! This area was also when any slops from the 2 stroke oil reservoir would run over (the oil tank was in a tricky position and hard to get to and see meaning there was occasional spills). I say 'was' because I have changed to pre-mix and the fuel tank has easy access and a bigger lid.
|
|
|
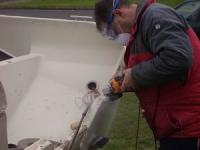
I tidied up the top of the transom by chiselling away the glass & gelcoat. I did not use the grinder because I only have paper masks right now however I'll make a trip to the Hardware store on the weekend and get a proper filtered mask and paper suits. Until them I'll minimise the dust factor.
|
After tidying up the cut
|
|

Use stainless washers on boats
|
I've discovered that fixing boats is a good way of learning what NOT to do. A good example is the tow rings. These are stainless steel and in good nick EXCEPT that whoever installed them (they look original) failed to use stainless nuts meaning what was left of them were stuck tight. I ended up putting a cutting wheel on the grinder and cutting the studs & nuts off flush with the glass. I was then able to push the hooks through with a hammer and punch. After nearly setting the boat on fire cutting the first stud I decided I should alternate between them allowing them to cool!!
|
|
|
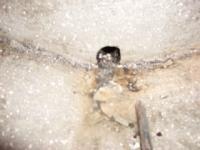
Another example of poor design is the thru hill fitting for the bottom drain. From what I can see (I'm yet to have a close look) this is an exterior fitting that does not run the whole way through the transom. Even if the timber is sealed, this is asking for trouble and it will be replaced with a properly sealed brass thru hull fitting.
|
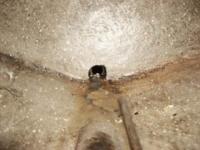
Drain hole NOT sealed
|
|
Transom timbers
|
The transom timbers are surprisingly good. I do think this is deceiving though as:
1) The boat has been out of the water 6 months and kept under shelter allowing everything to completely dry out.
2) I can only see the top of the timber and I suspect the damage is worse towards the bottom where the water would sit.
Nonetheless you can see where the timber has started to rot where the water got in.
|
|
|
The gelcoat had cracked in the bilge. This is where water would 'pool'.
|
Gelcoat cracking
|
|
Where I plan to cut
|
Last night was significant in that I made some of the first real cuts in the floor. With these sorts of jobs it's easy to let uncertainty dominate and you can find yourself standing around pondering too many "what if's".
The biggest 'what if' in this whole project so far is how to avoid ending up with a saw blade through the bottom of the outer hull. With this risk in mind I drilled a series of holes in the floor allowing me to measure the depth below the floor timbers. This depth is not as easy as you might think to guess because the floor has three 'tiers' plus the bottom of the hull is a 'v' shape meaningthe depths vary greatly. Anyway, as I thought the floor sits on the hull in places and I am going to have to be VERY careful.
I have been using a grinder with a diamond blade to make the cuts and it's like a hot knife through butter but I've come to the conclusion while it would suffice, it's really not the right tool for the job. It's too dusty, too hard to control and will not reach right into corners or other hard to get at places.
I got in the car and went up to Bunnings and came home with a reciprocatring saw. These tools are so damn cheap these days and come with a good warranty so if it blows up who cares? In many cases it's cheaper to buy tools than hire them but I tell you what, I'll spend far more on tools than on materials over the course of this whole project!
Tools is similar to fishing tackle though, you can't have too much!!!
I also bought a proper twin filter respirator. I reckon 50 bucks is cheap compared to the consequences of breathing fiberglass dust. The paper masks just don't cut it and I find they direct my breath into my eye protection and cause the goggles to fog up which is a pain in the arse not to mention dangerous.
|
|
|
This was made difficult in that I did not know the layout under the floor so it was hard to know how to approach the job. I ended up removing the glass skin on the top of the step-up's revealing a masonite centre. I then cut this and the stringers out. The masonite and the stringers were wet.
|
Where I did cut!
|
|

Remove top inside skin
|
As you can see, my transom is thicker at the top courtesy of a hardwood reinforcing brace. I cut under the hardwood, just through the glass skin. I then cut up the sides where the gunwale joins the transom. Then, using a chisel and crowbars I peeled the skin off the transom.
|
|
|
As the top of the transom is thicker than the bottom, it was difficult verging on impossible to make the floor cuts as the grinder would not fit. To remedy this I decided to remove the think hardwood top of the transom first. To do this I first drove a chisel and crowbars to separate the hardwood from the ply backing. This was not too hard. I then cut the hardwood into sections which broke off with a bit of persuasion.
|
Removed hardwood timber
|
|
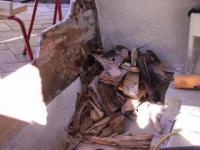
Lots of timber
|
Hardwood timber cut out of the top half of the transom
|
|
|
This involved removing the plywood from the outer skin of the transom. This was easy in parts and bloody shithouse in others. As the ply was wet it was easy to separate the layers of ply leaving the last layer still bonded to the fiberglass. There was no shortcut to remove this. Many hours of hammer and chisel work to remove 99.99% of the wood.
|
Transom timber removed
|
|

Does this look like a days work?
|
Looking at the pictures you probably think I snuck off to the pub for the day.
No such luck!!!
Today was spent tidying up yesterdays work. This included grinding all remaining timber from the transom and floor sections, cutting and grinding the bottom of where the stringers were and grinding off the gelcoat wherever I intend fiberglassing everything back in.
|
|
|
The transom is cleaned up and you can see the lighter areas where I've ground off where fiberglass will eventually be.
|
Grinding
|
|
More grinding
|
It was unbelievably dusty work. I stopped every 20 minutes or so and vacuumed but still there was just so much dust everywhere
|
|
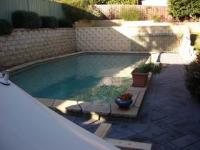
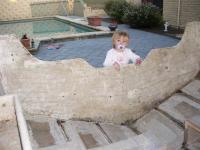
The last shot of the pool shows the layer of dust on the surface. By the end I had to hose my entire back yard and carport to ghet rid of the dust.
I am very itchy right now!
|
Dust EVERYWHERE
|
|
Starting on the floor
|
Yesterday I took up some floor sections to inspect the stringers. The stringers look fine and I've done some exploratory drilling and there's no moisture. This means the only stringer replacement I need to do is the back couple of feet from the transom which is easy.
|
|
The stringers and braces are ok thankfully!
I saved the fiberglass sections I pulled up to inspect the floor and it will be a simple job to replace the masonite floor timbers with treated ply and glass in the saved panels back in.
|

More floor sections taken up
|
|
Water damage at the front of the bilge
|
I was looking after my little girl today who has Chickenpox but she slept for a few hours which allowed me to grab the baby monitor and head outside.
In a productive little session I did some drilling into the keel stringer with a 19mm bit and decided the whole thing definitely has to come up.
No point procrastinating so out with the rule & marker for some measuring up then out with the grinder and up witha 1' wide section of floor for full access to remove the stringer.
Up the front of the boat you can see the extent of the water damage. The front 6" under the floor was FILLED with what can only be described as mud. Dead set you could have grown veggies under there!!!!
|
|
|
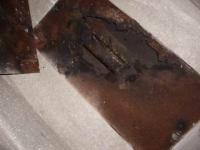
The same cam't be said for the keel stringer though. My keel has a small leak right under the stringer which has allowed water to get in. I suspect the entire stringer is gone but at least some of it will need to be cut out, have glass laid under and replaced with new timber. This is by no means a disaster and probably will account for a days work.
|
Keel stringer rotten
|
|
Cutting out the keel stringer
|
Once back home I got started removing the keel stringer. This was not an easy job as I couldn't get a cutting wheel close enough to the base of the stringer. I ended up using the good old hammer & chisel and it was probably a 2.5 hour job to get it out. As I thought the keel was leaking under the stringer and lettting water in. The timber was wet and around 30% rotten plus the glass had delaminated from the wood.
I spent the remaining couple of hours grinding off gelcoat back to the glass anywhere I intend glassing when the floor & transom goes back in as resin won't adhere to gelcoat. This is a dirty, smelly & dusty job and not much fun at all. I just keep my mind focused on the end result and battle on through it.
I knew this would be messy and hence moved the boat out of the carport. By the end of the day the boat had piles of dust inside so I ended up backing the boat onto the street (we live on a hill) and hosing it all out. Not very environmentally friendly but better than having fiberglass dust blowing all over the yard being breathed in by my one year old.
Tomorrow I'm grinding where the keel stringer sat and all around it where I'll be glassing.
Fun & games!
|
|
|
The keel stringer I cut out. It was easier to remove it in pieces towards the front
|

The Keel stringer is OUT!
|
|
Ready for rebuilding
|
Today was not fun. Grinding, grinding and then some more grinding followed by some grinding and after lunch (the Mrs came out with two sausages in rolls with sauce) I did some more grinding.
Bottom line is that the gelcoat is removed from pretty well everywhere I need to glass over. I moved the boat down my driveway but even then dust was getting all over my neighbour's cars so I ended up reversing the trailer onto the nature strip which is as far away from others as I could get it. I still ended up hosing off the neighbours cars at the end of the day and I noticed dust on the cars up the street but the hose does not extend that far!
Today the dust was so bad I would grind for 20 minutes or so and then hose the whole boat out. I should have taken soem photos because unless you have done this job you would not realise just how much dust is created doing this job. It is unbelievable.
The way I see it the dust has to go somewhere and it will either blow away and become an airborne hazard or I could wash it out and more or less contain it. I realise it's the lesser of two evils (don't email me about water restrictions please) but as far as I'm concerned what I've done is the best way to deal with the problem.
Tomorrow (bank holiday) I'm off to the timberyard to buy the new keel stringer. I'll then fashion it to the right shape and do my first ever fiberglassing!!! 6 months worth of reading and education will come to the fore tomorrow so stay tuned for the result.
|
|
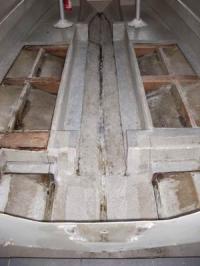
You can see where I've ground away everywhere where glass needs to adhere.
You can also see my helper and #1 fan!
|
Everything clean and ready fro rebuild
|
|
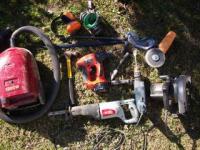
Tools used in this phase
|
Circular saw, power drill, grinder, shop vac, reciprocating saw, hammer, chisel, screwdrivers, crowbars, eye protection, ear protection, dual filter respirator.
|
|