|
'Donor'
|
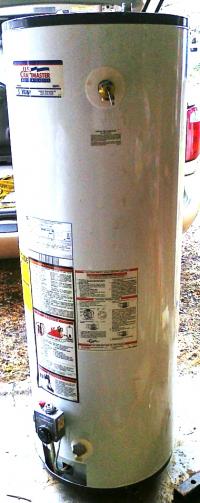
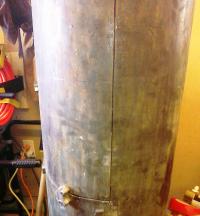
I helped a friend swap out his water heater and also helped to 'take out the trash' There's a 40 gallon steel tank hiding under that 'beautiful' exterior..
|
|
When I 1st started stripping the outside metal off of this. (A SawZall is a really handy tool for a job like that)
1 pulled the top off and found fiberglass insulation. I figured that the whole tank was covered in 'glass..
Wrong, seemed that they used poly foam insulation for the bulk of the tank. There is a thin 'glass blanket around the bottom and on top, but the sides are covered in sprayed on foam.
How do you get that off of there??
|
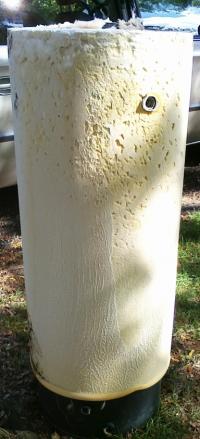
Foam Insulation? What happened to the Fiberglass?
|
|
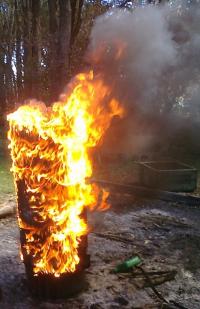
FIRE!, FIRE!
|
Well, its going to have fire in it right, might as well "Test its Metal' now. I tried some scraping and the wire brush, etc. and well the easiest way to do this was to burn the insulation off.. A little cleanup after the 'burn off' with a scraper and we have ourselves a 40 gallon steel tank.
|
|
I'm trying to work towards a design similar to the old potbelly stove we had when I was a kid, it had a tall 2 piece door. So i setup an 1/8 inch thick metal cutting disc in my right angle grinder. Laid out the shape of the door and cut it out.
Since this was a gas water heater, thats the original chimney in the center of the tank.
|
Cut the door out
|
|

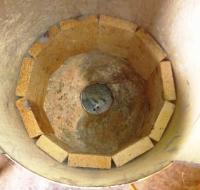
A little scale in the bottom
|
Actually the entire inside of the tank is covered in scale.. That's why city water systems add calcium Carbonate to the water to buffer it and seal small leaks. And yes over time this can fill up your water heater.. there was enough scale in this unit to clog the drain valve.
|
|
Since I was worried about the coals falling through the grate and rolling up against the sides of the tank. I should back up.. The bottom on a gas water heater tank slopes up in the center to the chimney, which I have already cut out in this picture. The slope on the bottom of the tank will cause things to roll to the outside and possibly overheat the tank, I don't know.. It a PROTOTYPE..
I placed firebricks around the outside of the tank to insulate it and these will also serve to hold up the grate.. and provide an 'ash pit'. One of the bricks I trimmed down to fit the last spot and complete the circle with a diamond blade in the right angle grinder.. Bought the diamond blade at Harbor Freight, cheap price, works for what I need it to..
|
Preparations for a grate
|
|
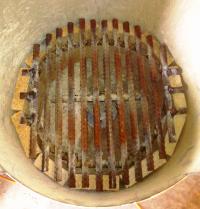
One custom grate.
|
Believe it or not this used to be a 20 foot length of 5/8 inch rebar.. I spaced each bar about 1/2 inch apart.
So,how do you get a 20 foot length of rebar home in a minivan? You bend it in half at the lumber yard and it fits. the part that was bent I finished making into a circle and that's what is holding the grate together..
Lots of welding practice on this thing.. I added some small scrap pieces on the right and left ends so that the layer of firebrick I added on top would sit level. Again this is just resting on the firebricks that are setting on the bottom of the tank.
|
|
I cut more firebricks in half and added a layer on top of the grate to complete the 'firebox'. There is one brick left over from three boxes of six bricks each. I left the hole where the original water heater chimney was in the bottom of the tank as the draft or air inlet.
I put the tank back on top of the original burner ring and base. With out the gas burner obviously. I use the opening where the gas lines used to enter the base as an adjustable draft door..
|
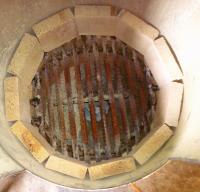
Final Firebox parts
|
|
Now for the door
|
Time to hang the door, Need some hinges and a latch at the very least. But how do you hold the door in place to mark the hinge and latch locations ?
Well its metal, so how about using magnets to hold it for alignment. i have some old rare earth magnets out of computer disk drives and they worked great to hold it while I aligned the hinges, etc.
|
|
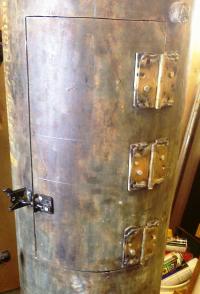
I know, why three hinges.. Well the plan is to split the door in to two pieces a smaller top and a larger bottom. So, one hinge for the top door and 2 hinges for the lower door. And yes that is a fence gate latch.. I was looking for something that was all metal and this filled the bill.
And yes there are spacers under those (door) hinges. I wanted the door to swing out and away when it was opened and if I have to put a flange or over lap on the side by the hinges, I may need that room.
(With all of the remodelling we have done to our house, I have an entire drawer full of brass colored hinges. So use what you've got on hand.)
I've got a second one of these latches for the top half of the door.. Once I cut that part off the main door.
The way the doors on the pot belly worked was that 95% of the time you opened only the bottom part of the door. The upper part was actually only there if you had something really long to put in the stove. And it also served to make a large opening when you wanted to clean the stove out. Also opening only the lower door reduced how much smoke escaped when the door was opened.
|
Hinges and a latch..
|
|
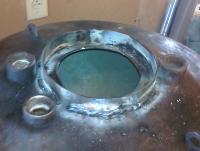
Need to attach a 6 inch chimney pipe to this guy
|
the hole I had left after I cut the original water heater chimney out was about 5 inches, and I am using 6 inch black chimney pipe. I need a collar or something to join the chimney to the stove - tank. I dug up some 1/8 inch thick by 1 inch wide flat iron in the shop and bent it into a circle that fit the inside of the pipe. Weld that onto the top of the tank and you have a collar for the chimney..
The three holes are the original water in - out and sacrificial anode holes. They all now have 3/4 inch pipe plugs in them.
|
|
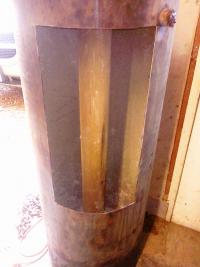
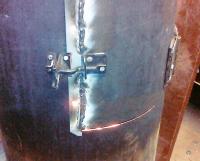
The 1st test firing shows that it all works, but without any overlap or flanges on the door, it smokes if you close the damper down allot.
Dug up some more 1/8 inch strap iron in the shop and welded it to the door.. Of course I'm not the welding guru so I had to take the door off and lay it down to weld that top strap on ..
What damper.. Next slide please
|
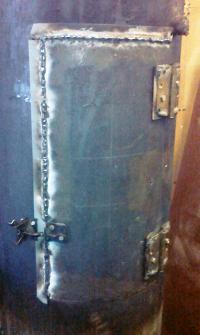
Door will need flanges and gaskets
|
|
Chimney - Smokes got to go some where
|
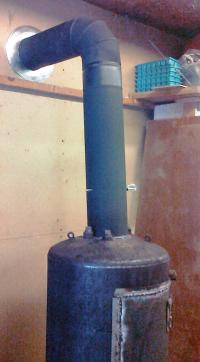
Again working on the low cost model here.. I am using black steel chimney pipe for the entire chimney.. This exits the side wall of the shop through a 'thimble' that is double walled and keeps the wall around it from burning.. Then there is a Tee fitting outside oriented so the bottom is open. that gives the rain somewhere to go and it also helps induce a draft once this gets started.
There is a cast iron damper I added about a foot above the stove so that I can control the draft and thus how fast the fire burns.
If you do build something like this, PLEASE DO NOT USE HVAC duct work for a chimney.. I know that galvanized duct piping is really cheap.. But all you have to do is compare the weight of this chimney pipe to the duct piping.. This stuff is 2 to 4 times thicker than the galvanized, and you need that extra metal all over. The pipes nearest the stove are subjected to the most heat.. The ones outside are subjected to rain, snow or 30 mile an hour winds like we are having right now.
|
|
It took a minute to get a good camera angle to show that there is infact a fire burning inside of there. And there is..
I was able to get the temperature of a 24 foot by 24 foot, 2 car garage up to 60 degrees with this stove by burning 4 pieces of firewood that had been split in about an hour or so.. I did use a fan to help circulate the air since the stove is located along one wall.
But it throws the heat.. Kind of reminds me of that old Potbelly stove back home...
|
Just to show that I really have a fire in here
|
|