|
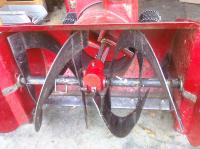
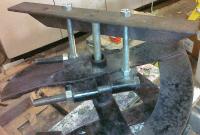
The business end of my 1969 Vintage 2 Stage Snowblower
|
The business end of a 2 stage snowblower. One that was build in 1969 – 40 years ago and its STILL BLOWING SNOW..
Did you know that these augers, although seemingly very basic, require periodic maintenance??
As you see in the picture there are pins (shear pins or bolts) in the augers of 2 stage snowblowers that connect the augers to the shaft that drives them. All of this is connected via a worm gear in the central gear box to the blower shaft that is driven by the engine.
The design is that when, notice I did not say IF – because you WILL suck of something someday, something gets jammed between the auger and the housing or the 'bucket' the pins will shear, the auger will stop turning and the rest of your snowblower will (hopefully)NOT be damaged.
So, what's this preventive maintenance you're talking about? Well, those augers need to be lubricated so that they can spin freely on the shafts. Once each season take the pins out, make sure the augers will spin by hand and work some oil between the auger and its shaft.
They're hard to see, but when I had this all apart I added grease zerks to the auger so I can pump grease into it each year. If you have a chance to disassemble your unit I would suggest you do like wise.
|
|
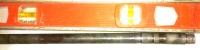
I know, its kind of WHAT am I looking at picture.. This is the blower shaft out of my 1969 Reo – Wheel Horse 2 stage snow blower. I was trying to think of a way to emphasize just how bent this shaft really is and if you look at the gap between the shaft and the level at the left side of the photo you get an idea of how bad this is.
This is what happens when the shear pins in the augers of a 2 stage snowblower DON'T work and you suck up a rock or tree branch or something. In my case it killed the engine when I sucked up the rock. This is also why you want to police the areas you clear of snow to make sure there is nothing to suck up other than snow.
I bought this snowblower used about 4 years ago and at the time I noticed that there weren't any shear pins in the holes of the augers. That was because the augers were seized to the shaft with corrosion. Keep in mind that the center of each auger is a pipe 10 inches long wrapped around a 1 inch diameter shaft and corroded for 40 years, so, it might as well be welded on. It was one of those. I need to fix this, but other things took higher priority until..
..when I sucked up a nice big rock, something had to give and the blower shaft was it.. Also consider that this is a ¾ inch diameter steel shaft, its not a lightweight aluminum thingy but something this is real metal material from back when things still said 'Made in the USA' on them. All that to say that there is some real force involved here. Lucky for me this didn't break the cast iron gear box, or break the worm and spur gears in the gear box.
Why am I going through all of this explanation? So, hopefully I can convince you to do the maintenance and prevent this from happening to your snow blower. Because repairing this is... Well next to impossible.. I only needed:
Hydraulic press
Metal Lathe and Tooling
Milling machine – ala modified drill press
Arc Welder
Angle Grinder
bearing separators, and gear pullers
Various drills, bits, wire brushes, etc.
And LOTS and LOTS of time..
(and I still spent less on all of this equipment than the $500 to $700 they charge down at the HD for a 'new' snowblower.. Made out of tin and P L A S T I C.)
|
Why you want to Make SURE the shear pins in your 2 stage snowblower work
|
|
How do you pour oil into this thing?
|
The 'rub' on this project is that yes the gear box and blower shaft come out of the unit fairly easily.. In the case of this old Wheel horse, the unit splits in the middle and you can take the entire front blower off of the engine and wheels with a couple of pins.
But, just replacing the blower shaft without fixing the stuck augers is not going to keep you running for very long. You must get the augers loose so the shear pins can work.
That's what penetrating oil is for Right?? Well, how do you get it down between the center shaft and the auger? The end of the center shaft actually sticks out farther than the auger so you only have a small lip to put the oil on, and I don't really have time to stand here all day and add a few drops of oil every so often.. So what to do, what to do??
The photo shows a piece of PVC pipe, this turns out to be a part of a sink drain trap that I had around the shop, jammed on over the auger and shaft. I have this setting upright in a trash can to keep the whole thing from falling over.
I filled the PVC pipe up with oil, believe me over the course of several MONTHS I tried everyone's favorite brands, PB blaster, Liquid Wrench, etc, including mixing my own. I can not say that the oil ever really penetrated into the joint.
OK, second problem, how do you press, pull, etc this thing apart, assuming of course that the oil actually un-seized the joint, which it didn't, so far.
|
|
I borrowed a friends hydraulic press and I THOUGHT I would just put the entire 2 augers and center gear box in the press and press the shaft out of the augers, one side at a time. I was working on a split table for the press so I could work around the gear box to get the 1st auger off, when if finally dawned on me that this is a rather TIGHT fit.
As it turns out I could not, even without the press, get a bearing separator between the gear box and the end of the center pipe of the auger. It simply would not fit in there.. There is NO room. And, you can not get the gear box apart or off until you get at-least ONE of the augers off.
So how in the world do you get this off? Pressing it won't work.. SO I guess you have to PULL on it?
|
How do you get a bearing separator in THERE?
|
|
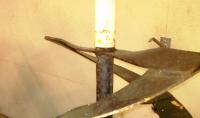
Improvised Gear Puller
|
Ok,so moving back away from the gear box to the end of the shaft and auger. Because the center shaft sticks out beyond the end of auger it leads one to consider using a gear puller type of mechanism to remove the auger.
You can't pull on the outer rim of the auger, you need to grab it close to the center, etc. SO what finally materialized was a large bearing separator clamped around the auger at the end, with 2 - ½ inch bolts connected to a ¼ x 2 inch angle iron as an improvised gear puller. (this photo was taken when I had already gotten the auger part way off..)
SO I got out the long handled wrenches and tightened up both of the ½ bolts.... And I tightened them some more.. Fortunately nothing bent or snapped. And I added more penetrating oil. And I waited....
And I got out both of the propane torches I own and headed the auger up.. And I heated the auger up.. And basically I only succeeded in cooking what little oil had penetrated into the joint back out of it.
I whacked on the sides of the auger with a small hammer to try jarring it loose.. I whacked on the end of the puller and the shaft with a BIG hammer trying to knock it loose. But NOTHING MOVED.
No Joy in Mudville.
At this point I was quite literally stumped.. I couldn't get this into the press to press on it.. and the biggest puller I could make was not moving it. I had used penetrating oil, heat, gear pullers, hammers and torches and nothing was moving.
So I let it sit, while I worked on machining the replacement blower shaft. You really don't think that Toro, who bought out wheel horse, REALLY stocks replacement parts for 40 year old equipment do you?? Just me, a piece of ¾ inch diameter ground drill rod and my Chinese Minilathe..
Well, I happened to be explaining my dilemma of the stuck auger to my friend that owns the hydraulic press and he got to asking questions and finally we arrived that the point of; “Well, can you split the pipe that makes up the center of the auger open? Can you spread it at all?”
I have some really thin metal cutting disks for my angle grinder, and I used them to cut a groove down as much of the length of the auger's center pipe as I could.. Then I took a cold chisel and hammer and did the best I could to make the groove wider.. I also now had a way to pour Kano Kroil penetrating oil into – onto the center shaft via the slots..
I let that soak over night and then I put my puller back on and tightened it up and finally things started to move.. I FINALLY got one of the augers off of the shaft.
I started this project back in September, its now Christmas vacation and I have been working on this all day every day this week, in order to finally get to this point.
Of course the auger now has a groove cut down most of the 'hubs' length, but the auger is FINALLY OFF of the SHAFT.
After much wire brushing of the center shaft and sanding the inside of the pipe, I welded up the grooves I had cut and reassembled everything with new seals, snap rings, etc. Added grease zerks and LOTS and LOTS of grease on the auger shaft.
It is amazing that the iron worm and brass spur gear showed no real wear after 40 hears of use.. I guess any kind of grease is better than NO grease at all. And 'Made in the USA' really used to mean something.
By the way, getting the second auger off of the shaft was not a whole lot easier.. I had it in the press, now that the gear box and other auger were out of the way.. and with a 12 TON jack in the press it WOULD NOT MOVE until I basically cut it open like the 1st auger..
|
|
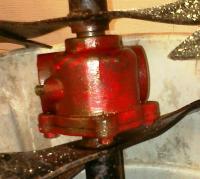
The finished product, with new blower shaft courteous of my shop, all back together and blowing 6 inches of packed snow like nothing..
And no, I did not repaint everything while I had it apart. I was barely keeping the shop warm enough to work in and definitely not warm enough to paint.. Besides the paint on this 40 year old unit looks better than the 5 year old Crapsman snowblower I picked up of the curb a couple of years ago..
I SOLD the Craps man unit, because this 1969 unit is a REAL Snow Blower, and it is worth EVERY HOUR I put into it..
|
Finished Product, New Blower Shaft, working shear pins
|
|