|
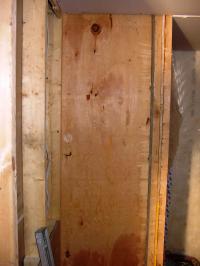
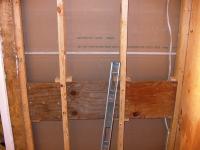
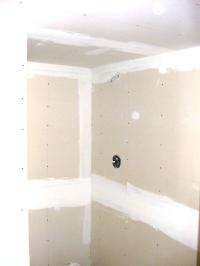
North Shower Wall
|
This shower is interesting and challenging because it crosses the joint between the original house construction and the new addition foundations, crawlspace and walls. This north stub wall is actually part of the original construction. These Wausau houses have 1/4 plywood over all of the walls. I think they did that to make it easier to ship this stuff on a truck.
This is the view as if you were walking to the shower and we'll take a little tour of each wall turning around to our right as we go.
So the closet wall is visible to the left in this photo and the main body of the shower is to the right.
|
|
|
This is again the original house construction. This was originally the outside of the house and we stripped off the sheathing because we're putting Drywall on this wall and didn't want to mess with the extra thickness. along with the fact that we already had torn into this wall to add blocking for the framing of the addition
|
North West Shower Wall
|
|
East Shower Wall
|
This is part of the east wall of the shower and its the longest, 84 inches of any of the walls in the shower. The main part of the shower is 42 by 84 and has a 7 foot high ceiling.
Here we can see the blocking we added to the framing for potential future hand rails and grab bars. If we stay in this house another 20 or so years, we'll probably like having those.
If you are looking at the large photo and wondering what the hole is in the lower left, that's where the whirlpool platform butts up to the shower and because of the difficulty and not seeing a need, we didn't drywall over that.
Actually that worked out well, because we ran the water pipes through the floor without needing to go through the bottom plate.
We'll talk about plumbing and shower valves further on.
|
|
|
This the south shower wall, the one with door in it. It spans the new construction on the left into the original house on the right.
|
South Shower Wall
|
|
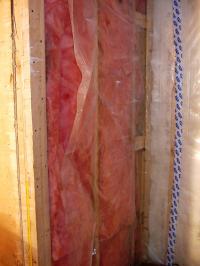
West Shower Wall
|
This is the closet wall and again, we installed blocking for future use if necessary
|
|
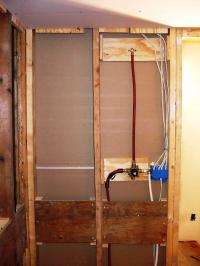
Ok, let talk plumbing for a minute. This is a typical pressure balancing shower valve installed with PEX plumbing. My Dad got me started on this stuff and it is AMAZING.. I installed 250 feet of 1/2 pipe, 5 separate runs in less than 1/2 hour. There are NO joints in that red hot water line from here all of the way back to the manifold at the hot water heater.
If you want to get a closer look at this, click on the picture and share a project will show you the hi-resolution original.
I use the stainless steel clamping system for PEX, there about 4 different pex clamping systems. This Video will show you about everything you need to know: http://www.taunton.com/finehomebuilding/how-to/video/how-to-make-basic-pex-connections.aspx
Of course when using copper to plumb this up, people usually use the pipe to hold and mount the valve. Well with PEX you cant do that. So that's why there is 3/4 plywood around the sides and back of the valve and the dropear for the shower head. That was about the easiest way I could come up with to mount the valve the right depth for the 1/2 drywall and tile.
I thought I would have enough room in here to just use the straight threaded adapters with a bend support (the black plastic thing on the red line), like the hot water line on the left does. But it turned out with the plywood in the way and wanting to shift the valve off center in the stud cavity I wound up with the elbow on the cold water line.
Again, would have been better with a right angle threaded adapter. But I had the straights and used them
|
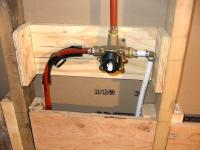
East Shower Valve
|
|
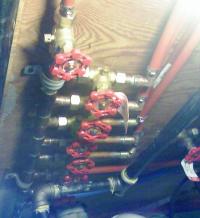
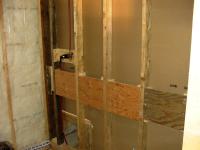
Hot Water Manifold
|
OK, this is NOT the most beautiful plumbing job I have ever done, but its functional. There are 8 separate Hot water connections coming out of this. 2 legacy connections, 5 connections to the new addition and 1 spare.
Why a manifold? It wall boils :-) down to how fast you can get hot water at the faucet. Each faucet in the addition is on it own 1/2 pex line all of the way back to this manifold. Now if we had installed this using traditional methods of 1 - 3/4 inch line with taps off of it, you would have had to run an additional 2 1/2 gallons of water down the drain to get hot water at the sink as compared to this home run setup. AND, if I had used 3/8 PEX, which is not that common around here, the water saving would have been even greater.
I soldered this up out of copper fittings instead of a manufactured manifold, partly because I couldn't find the number of outlets I wanted, and COST, those factory manifold are EXPENSIVE.
The reason there are 1/2 compression valves in there is because HomeDepot was clearing out their stock of valves and I got these valves for around $2.50 each. Cheap I know..
|
|
Here is the other shower valve the one by the door. Some things I learned and comments about PEX. I didn't have ANY connection problems with pex, Its all of these #%$^& threaded connections that gave me fits.
I had originally assembled all of the threaded fittings with Pipe dope instead of tape, I had it handy because I have just finished some gas line work. When I pressure tested this ALL of the threaded connections leaked. (and did not know that pressure balancing valves are just that. I turned off the hot side of the valve at the manifold, forgot about it and then tried to turn it on and nothing would come out. Pressure balancing, no pressure on the hot side = no water out of the cold side either)
I wound up taking every one of these threaded connections apart, cleaning them and using Teflon tape on all of them. The interesting this is that you can unscrew these, spinning the adapter inside of the PEX, reassemble it and the PEX will STILL NOT LEAK !
Also, HIGHLY recommended that you put a capped pipe where the shower head would be and pressure test that at the same time. Don't ask my why I know this :-)
|
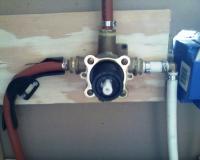
South Shower Valve
|
|
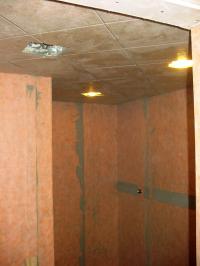
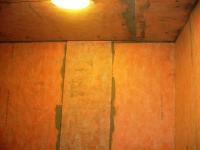
Rocked and Ready for Kerdi
|
The blocking is all in, the plumbing is ALL pressure tested and we have drywalled the entire room. And, I know you're thinking, No green board, no durock, no hardy backer??
Well, Kerdi waterproofing membrane makes all of that obsolete.
We installed 5/8 drywall on the ceiling and 1/2 on the walls. You only need to tape and fill the taped joints. The Kerdi will in many ways act like and better than drywall tape. The reason for taping and filling tapered joints is only to make the wall smooth and level. You will notice none of the screw heads have been filled and that band of mud around the ceiling is only on the walls where it is filling the tapered edge of the panel. and, we backfilled the inevitable cracks in the corners.
|
|
To learn about Kerdi go to: http://www.schluter.com/8_2_kerdi_drain.aspx Click on the VIDEOS link and enjoy.
The first thing to keep in mind is that ceramic tile and especially the grout in between then IS NOT WATERPROOF.. I know shocking, but if you wonder why tiled shower mold, its because water is trapped behind the walls and under the floors.
Kerdi is installed right behind the tile, it provides a water proof barrier through out the entire shower up to and including the drain. So the ONLY thing that can retain water in a Kerdi shower are the tiles, the grout and the thinset. And, actually a Kerdi shower will dry out before it is used next because there is so little water trapped.
A shower built on CBU or mudded or whatever method used will be soaked constantly. That's why Durock makes the big deal about there product soaking in water constantly. Because with out a waterproof barrier, it is soaked all of the time.
You're probably wondering, you just drywalled this and now you're already setting tile? What about floating the floor, etc? In the case of ceiling gravity is NOT GOOD. Its called raining thin set, and its MUCH easier to clean that off of the subfloor than off of the floated floor.
we also installed all of these tiles at 45 degrees to the wall, for two reasons:
1. We don't have to worry about the grout lines of the wall tiles lining up with ceiling grout lines.
2. Its a little more interesting, but also a whole lot more cutting, then setting the tile square to the room.
|
Kerdi, Plus Lights, Plus ceiling
|
|

Kerdi around valves and a close up of a kerdi seam
|
OK, how does this Kerdi stuff work? Well 1st of all EVERY seam must be overlapped 2 inches. There is actually a like imprinted on the kerdi so show where the 2 inch line is. And you run Kerdi RIGHT up to and around ANY wall penetrations.
what happens at this valve if water is running down the front of the wall tile, perhaps it follows a grout line that its tooled perfectly and it gets in behind the shower valve trim?? In a traditional shower thats called soaked substrait. In a Kerdi shower its called Water directed to the drain.
There is a special sealant for Kerdi, similar to Silicone caulk that is round this valve behind the kerdi sealing the joint. so the water just continues on down the wall.
|
|
And if YOU never make a mistake, God bless you. I got my layout lines confused and after I had hung this sheet and the thinset was set I figured out it was crooked and the over lap was not 2 inches at the bottom.So what do you do?
Well you patch it of course.. I actually very carefully cut along the overlapped seam and pulled the overlap off. I scraped the thinset down and created a 1 foot wide patch, that goes from ceiling to floor and now this joint meets the 2 inch over lap rule.
|
Whoops, Joint Lap not wide enough !
|
|
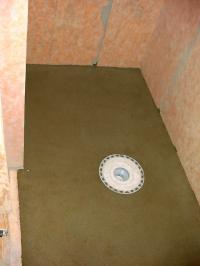
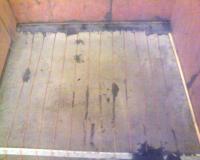
Float the Floor
|
Here is our floated floor, isn't pretty? Its amazing how much picture DON'T SHOW.. This did turn out nice. Not perfect and we knew that because there are more steps involved in the floor.
One thing before I forget in the far lower left of this photo you can see the original house floor, that is part of the shower. The part that we 'floated' was framed up as a dropped floor relative to the house. Since the 'house' part of the shower is entry only, we added a wedge to this area for a 1/4 inch in 1 foot slope.
Now the extra steps for the floor. Ceramic tile floors are cold, especially for BARE feet and I don't want to think about how much hot water my wife would be running down the drain before she decided that the floor was warm enough to walk on. Soooo.
We are installing a electric floor heating system. And everyone one screams, are you trying to electrocute yourself? Well, NO, especially since the heating system will be behind a waterproof membrane.
But the extra work comes in because we need to install the heating wires on top of the floated cement and then cover them with 1/4 inch thick layer of thinset.
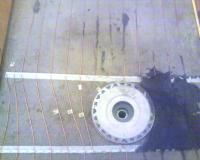
In the center of the picture you can see the Kerdi drain and yes, its special you can read all about it on their website. The fun part of this install is that the drain needs to be set and cemented in at the finished floor height, while the rest of the cement must have a slope of 1/4 inch in 1 foot and also be 1/4 inch below the finished height to allow for the heating grid.
|
|
Installing the heating wires. According the manufacturer of the system we used, you could just staple these plastic tracks down to the sub flooring, Yea, right, what about cement guys. Well fortunately hot melt glue works. Put a large blob of every so often and it will hold the track down. We also found that we could use tacks to hold things in place as well.
These plastic tracks are also supposed to function as guides for floating thinset over the wires. Well kind of. You have to make sure the wires stay down. In this photo we have already started to thinset the ends of the room where the wire turns at the end of the runs. in some cases there are blobs of thinset on the wires trying to get them ot set down before we float over them.
We wound up using 1/4 inch thick wooden strips to help gauge the thinset thickness. Tack them in with hot glue, trowel in the thinset, let it setup, take the wood out, fill in the space..
|
Wiring the Floor - Resistve Heating system
|
|
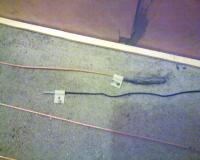
How do you wire around the drain?
|
We tried a number of layouts for the wire and we never could get a good layout because of the drain.
So as you can see we have one line that runs right around the drain. others that are pulled off to one side and tacked down. You have maintain a separation between the wires other wise you can get a hot spot and burn the system out.
|
|
Here is where the power lead and temperature probe come into the room, they actually come up from the floated floor.
Because the power lead of fatter, we chiseled out some of the cement to keep it below the floor line.
|
Power Lead in and Temp Probe
|
|
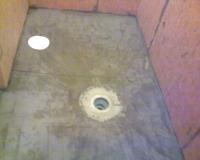
Final thinset job
|
It took something like 4 different batches to get the floor to this level. At one point we had done the main floating and came back 24 hours later to find the thinset a little soft. then the temperatures rose along with the humidity and at the 48 hour mark we found the floor covered with sweet.
So, we hooked of the floor heater and fired it up, set for a gentle 65 degrees and in a few hours we were back at work..
|
|
Well, unless you want the entire shower to be a very boring BROWN all the way around, you need to figure out a way to add some color to the project.
We are already planning to run a border using the floor tile around the center of the walls, but we still thought we needed something extra.
So this is the mosaic we worked out for the back, North wall of the shower. This is composed of the wall tile turned 45 degrees with a border of the floor tile and some white 2 x 2 tile thrown in for good measure.
Taking the advice of John Bridges forum, this entire setup is laid out dry on the floor in the closet BEFORE we start any work in the shower. We tacked a couple of scraps to the floor to simulate the adjoining walls and marked out where this would start on the wall.
We also laid up one row of tile next to this that simulates what the adjoining wall would look like. those two pieces standing up on the top right are soap dish shelves approximately where they would go. They are 1/4 of a 12 x 12 granite floor tile. More on that later.
The challenge in laying this out is not so much the lay out and the cutting, its getting the spacing right. If we installed the 2 x 2 floor tile border with its standard 1/8 inch grout lines, we would have had about 3/4 of an inch of space we needed to fill in in the pattern. We considered putting a 3/4 wide piece of white tile, kind of like a key. Or using some plastic Listle we had previously use in the kitchen, but none of that looked right.
We finally settled on cutting the floor tile, the 2 x 2 chiklet into groups of 4 and increasing the grout space between the groups to the 3/16 inch space used between the other tiles and then the spacing worked out.
|
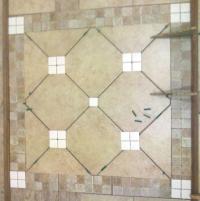
Mosaic Layout for the back Wall
|
|