|
|
 |
|
| home |
| |
shopping |
| |
contact |
| |
projects |
| |
Warning: Undefined array key "session_logged_in" in /home2/sap/public_html/header.php on line 612
login | | | join |
|
|
|
|
Achromatic Refractor Telescope
|
 |
|
|
|
|
|
|
|
|
|
Achromatic Refractor Telescope
|
|
|
|
Submitted By:
|
imhotep
|
|
Date Created:
|
02-26-2009
|
|
Description:
|
Overview:
This project involves the design and construction of a small refractor telescope. For those familiar with building telescopes, and more specifically the equipment needs of an astrophotographer, much of the following will be old information, but I wanted to include some background on how this scope was built and also explain the role that it plays in my imaging setup.
About the optical design:
Refractors are what most people see when they think of a telescope - a long tube with a lens at one end and an eyepiece at the other. Modern refractors have at least two individual lenses that are stacked together to form the 'objective lens'. An objective with two lens elements is called a ‘doublet’, making the telescope an ‘achromatic’ refractor. An objective with three lens elements is called a ‘triplet’, making the telescope an ‘apochromatic’ refractor. APO’s as they are sometimes called, offer superior color correction over doublets. They are also much more expensive due in part to their performance but also because they require that a total of six optical surfaces be figured and coated (three lenses, both sides).
Application:
My purposes in building a small refractor is to have a well-made guidescope for my astrophotography rig. The role of a guidescope is literally to guide a larger telescope while the attached camera takes a series of long exposures. From our perspective on Earth, the stars are constantly moving across the sky while our planet rotates. Astrophotographers use a computerized mounting system capable of tracking the Earth’s rotation. The mount’s axis is aimed at the celestial pole (near Polaris) and the accuracy with which the mount tracks any given target is a function of how carefully the mount is aimed by the user. Because no one is perfect, human error is always present. Over the course of several minutes the target will slowly leave the camera’s field of view due to a slightly imperfect polar alignment. The solution is to use a process called ‘autoguiding’. A second telescope with a second camera is mounted piggyback to the main imaging scope. The guidescope’s camera captures a live feed of a small patch of sky very close to the target being photographed by the other camera. This feed is processed by software running on a laptop where the user can choose a star to guide with. If the chosen star strays from the crosshairs, pulses are sent to the mount’s stepper motors to compensate. The result is a target that stays framed on the main imaging camera’s CCD chip for hours at a time, thereby allowing for long exposures with nice tight stars and rich detail.
Design:
For various reasons I chose to build an achromatic refractor using a doublet objective with an aperture of 80mm. This was influenced by the availability of cheep glass. In my opinion, high-quality optics aren’t necessary for a guidescope to do it’s job perfectly well. Specs like color correction and field flatness aren’t a concern unless you plan to use your guidescope visually. I don’t, so I purchased an inexpensive objective from Surplus Shed (www.surplusshed.com) that has a focal length of 400mm. This focal length will offer a fairly wide field of view from which to select a star for guiding. In my experience with past guidescopes, an aperture of 80mm is wide enough to reveal a good selection of stars with varying brightness (also a function of the camera’s sensitivity). This aperture also makes for a fairly compact and lightweight telescope that will not add to much weight to my mount’s load.
Construction:
Several components were purchased prefab, such as the 80/400 objective and the GSO single-speed crayford focuser. I machined the lens cell, focuser adapter, and dew shield from 6061 aluminum stock purchased online from Speedy Metals (www.speedymetals.com). The tube was purchased from Hastings Pipe Co (www.hipco-ne.com).
For those who are interested and/or savvy about related astronomy equipment, this guidescope will ride piggyback on an 8†f/5 astrograph (see my other project page). Both instruments will be mounted to an Atlas EQ-G with EQMOD and CdC at the helm. A QHY8 CCD camera will be used to image with the astrograph. I autoguide uisng an Orion StarShoot Autoguider and PHD Guiding v.1.9. My astrograph is currently a tandem ATM project to the guidescope and should be completed around the same time.
Thanks for checking out my project!
|
|
|
|
Displaying 1 - 9 of 12
|
Next >>
|
|
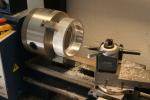
Boring out 6061 aluminum stock
|
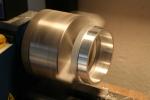
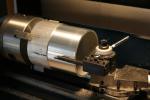
Turning down 6061 aluminum stock
|
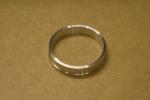
Completed Focuser Adapter
|
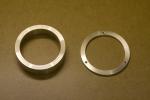
Completed Lens Cell
|
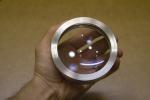
Installed Objective (front view)
|
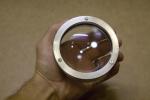
Installed Objective (rear view)
|
Machining the dew shield
|
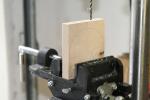
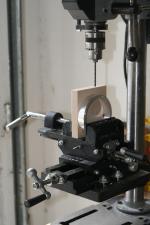
Homemade drilling jig
|
Focuser adapter & drilling jig
|
|
|
|
Displaying 1 - 9 of 12
|
Next >>
|
|
|
|
|
|
All projects on Shareaproject.com are user-submitted and should be used for reference information only. The projects are not intended to be complete "How-To" articles. Use the information contained in these projects at your own risk. Projects are not checked for completion, accuracy, or safety and therefore cannot be guaranteed in any way.
Outdoor Blog
|