Warning: Undefined array key "visitDate" in /home2/sap/public_html/header.php on line 6
Aluminum Boat Soft Transom Support - Outboard - Tutorial View

Warning: Undefined array key "session_logged_in" in /home2/sap/public_html/header.php on line 612
home | shopping | contact | projects | login|join
     Aluminum Boat Soft Transom Support - Outboard       
Search Projects:
 
Share Thumbnails Slideshow Tutorial

Aluminum Boat Soft Transom Support - Outboard
Submitted By: 88 Blue Fin
Date Created: 03-14-2009
Description: I have a 19 ft aluminum Blue Fin which I bought with a somewhat soft transom that flexed with motor movement. (it has a 90 Evinrude) As a possible alternative to rebuiding your transom and depending on the style of your splash well, I was able to add supporting 3/4 inch plywood to the underside of the well with 2 triangular wedges cut from 2x12s placed between the 3/4 ply and the floor of the boat. I aligned the wedges so that they rest above the two floor support beams.

On the interior upper face of this "sloping table" that is wedged between the floor and splashwell I bolted a 2 x 6 to the wedge & ply so that it is across the interior side of the splashwell. It was mounted so that it just barely misses touching the splashwell face.

I then purchased a 2 ft stainless threaded rod the same diameter as my outboard mounting bolts, welded a nut to one end and ran it from the back of the motor mounting plate, thru the transom hole, thru and out the front of the splashwell and new 2x6. (replacing the original transom mounting bolts) I placed a nut & washer at the inside of the transom and inside the boat on the face of the 2x6. I covered the exposed raw threads inside the splashwell area with black 1/2 '' id pvc irrigation tubing for safety and appearance.

The idea is that the pulling/pushing force of the motor is greatly transferred to this wedge system instead of being merely mounted to the transom. The wedge system is pulled being tightly into place while the transom is being pulled forward. I built this to accurately fit the space and it seems to be working well.

Tools / Materials: Go to the Boating Store


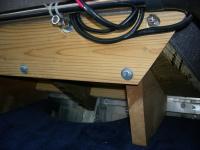
3/4 ply rests under splashwell to outer edges
The plywood and center wood piece apply rear pressure only to the center aluminum upright transom bracket. Nothing extends to the transom (only to the central transom bracket). The 2x12 wedge pieces fit tightly into place. The shape and angles of each piece mimic the splashwell

The motor mounting threaded rods are the shiny nuts at the top of the 2x6. I have an emergency trolling motor resting/fastened on the rod tips. The 3/4 ply is behind the 2x6 about 1/2 inch below the shiny nuts.

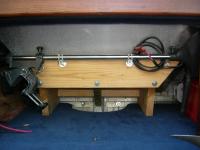
Interior view of stern. Aluminum splashwell with wood support.


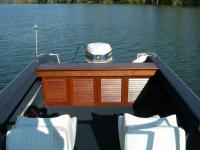
Finished Interior Stern Area
Made from shortened older bi-fold doors with a 12" oak stairtread across the top to sit on. You can make the 4 doors from one pair of bi-fold doors if the width is correct. Newer fingerjoint constructed doors are not recommended.

All projects on Shareaproject.com are user-submitted and should be used for reference information only. The projects are not intended to be complete "How-To" articles. Use the information contained in these projects at your own risk. Projects are not checked for completion, accuracy, or safety and therefore cannot be guaranteed in any way.
Outdoor Blog