|

(Insert New Caption)
|
(Insert New Description)
|
|
|
(Insert New Description)
|

(Insert New Caption)
|
|

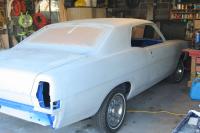
original
|
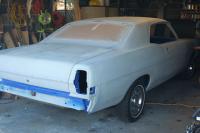
this is how the car looks before second owner had the body media blasted and sealed, have not made up my mind about how original i will keep the car,
unfortunatly most of the trim was also sealed black,
the only good thing the second owner did was seal the body.
some of his halfassed attemps at restoration will be quickly removed and done over, he lost and sold a few trim parts so will have to find new
|
|
|
(Insert New Description)
|

(Insert New Caption)
|
|

build sheet
|
this one was behind the rear seat back,,, found 2 more this one is in the best shape, one under rear bench and one under front bench seat.
|
|
|
(Insert New Description)
|

(Insert New Caption)
|
|

(Insert New Caption)
|
(Insert New Description)
|
|
|
(Insert New Description)
|

(Insert New Caption)
|
|

(Insert New Caption)
|
(Insert New Description)
|
|
|
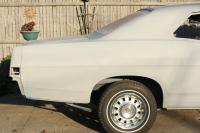
seems to be a pretty good match, going to use it as a template and cut out bad area of fender
|

patch panel
|
|

fabricationg fender patch panel
|
right fender is in pretty good shape except for a small area. I will be making a patch for this and welding it in
|
|
|
(Insert New Description)
|

(Insert New Caption)
|
|

(Insert New Caption)
|
(Insert New Description)
|
|
|
used a jigsaw with metal blade until i couldn't go any further because of obstruction in the back
|

cutting out old
|
|

patch panel
|
traced and made reference marks
|
|
|
used cheap cut off tool from pepboys(15bucks) works good so far, to get the rest
|

cutting out old
|
|

out with the old
|
i have to duplicate this part on the back, i'm not 100% sure what its supposed to look like. I know it bolts to the car right there.
I need to look at other side and take a few measurements.
|
|
|
template
|

template
|
|

back
|
checking for fit
|
|
|
I would end up cutting that side piece completely off and welding in back on with the right contours
|

template
|
|

template
|
i found this tip online and tried it for a pattern
|
|
|
welding 2 pieces together, i used the rusted part as a sort of guide to get the right curves
|

back side
|
|

old new
|
old new
|
|
|
front piece in
|

front piece
|
|

old new
|
old new
|
|
|
(Insert New Description)
|

(Insert New Caption)
|
|

floorpans
|
rust
|
|
|
(Insert New Description)
|

(Insert New Caption)
|
|

(Insert New Caption)
|
(Insert New Description)
|
|
|
I tacked it in place then jumped around with the welder as not to get it too hot in one area
|

front panel welding in
|
|

back
|
back side welded in,,, i will drill the hole and brace that flange when i know more exactly where the bolt hole needs to be
|
|
|
well i decided to do the floor next. while waiting for the pans to arrive i noticed the deck under the back seat was thin in spots and weak
|

floorpans
|
|

floorpans
|
I like to use paper and tape to make a 3d pattern, works really well. then just make a few strategic cuts to get it flat
|
|
cut to make it flat and trace on the sheetmetal. I then forced it into the area to get it to take shape, welded it back together and welded it into the car.
I repeated tis a few times and the back was complete.
|

floorpans
|
|

floorpans
|
rear floor
|
|
|
removed seatbelts and cleaned up the area, and cut out all the bad.........
|

Floorpans
|
|

floorpans
|
back is complete and this is very solid now, I'm 100 % happy with this repair, not invisable at all but needed to be done. I will take care of the underside when i clean the bottom of the car.
Floorpans are here and that will be next.
Also got a whole set of new seatcovers on ebay, brand new for 190 shipped, front and back, Need carpet. next.
|
|
|
putting the shapes together with the welder.this method is almost foolproof for getting odd shaped pieces, I may do this with the cowls when i get to that, haven't decided yet though.
|

floorpans
|
|

seat supports
|
i fabricated 2 seat brackets
|
|
|
right side with primer
|

cowl replacement
|
|

floor pans
|
old floor is gone new floor is welded in and sealed for now... needs a little grinding and its done
|
|
A friend at Fordmuscle.com donated two cowls cut out of his car, pretty much rust free and perfect for what i had in mind.
he completely replaced both top and bottom layers of his cowl area and had this left over.
entire dash,steering column, and welded in the donor parts....
worked perfect and i have rust free cowls
a lttle filler and its going to be hard to tell i did anything under there
|

cowl replacement
|
|
New quarters
|
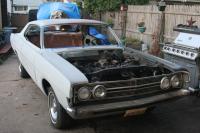
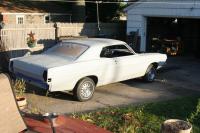
welded in both new quarter panels, removed gas tank and cleaned everything in the trunk. painted, car is primed with
SEM DTH high build primer,
here i was backing out the car for the first time in about a year, I need to turn it around so its easier to work on the front end and under the hood,,
My Rechromed rear bumper arrived safe and sound and man its a thing of beauty,
been storing up a lot of new parts, emblems, trim.
|
|
|
was in rough shape
|
cowl replacement
|
|
Quarter panels
|
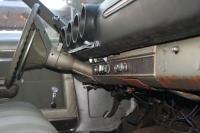
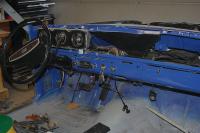
bought rust free dash from a GT, nice Black wheel also from a GT,
bought a nice under dash harness and cleaned every elecrical connection and all the other parts where disassembled and either cleaned or replaced, new heater core, replaced all the sockets for the gauge bulbs. The color is Ford Grabber blue.
|
|
|
(Insert New Description)
|
(Insert New Caption)
|
|
(Insert New Caption)
|
(Insert New Description)
|
|
|
(Insert New Description)
|
(Insert New Caption)
|
|
(Insert New Caption)
|
(Insert New Description)
|
|