|
(Insert New Caption)
|
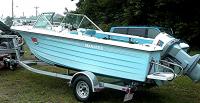
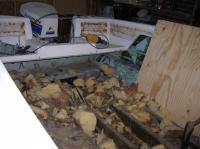
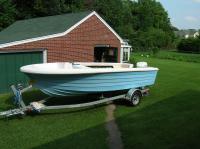
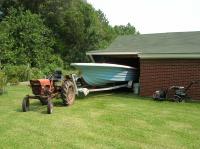
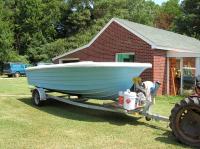
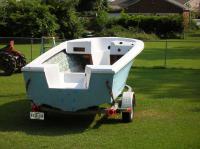
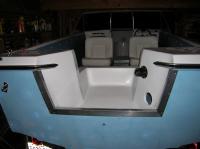
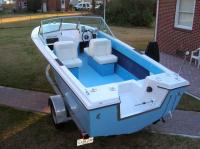
Purchased - June 27, 2006
|
|
|
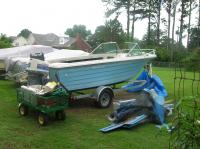
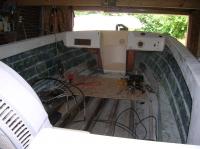
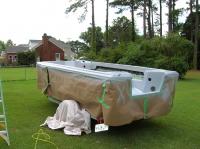
Stripping The Interior
|
(Insert New Caption)
|
|
(Insert New Caption)
|
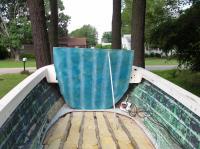
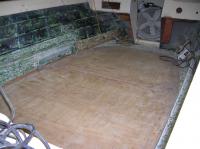
Seats, carpet & side panels gone....
|
|
|
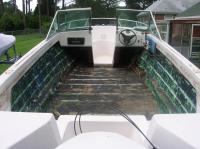
The floor is soft in many places...Will come out
|

(Insert New Caption)
|
|
(Insert New Caption)
|
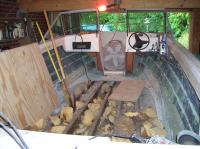
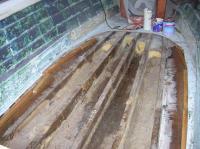
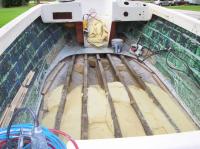
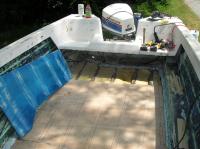
Floor out and foam being removed
|
|
|
Some of the foam on the bottom was wet. It's only been 28 years!
|
(Insert New Caption)
|
|
(Insert New Caption)
|
Added glassed in floor supports at perimeter to hold new plywood....
|
|
|
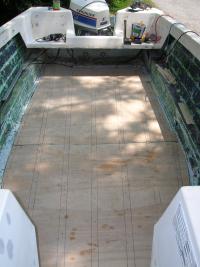
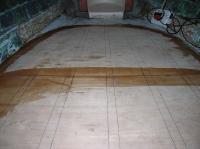
3/4" Plywood cut and dry fitted with stringer locations marked
|
(Insert New Caption)
|
|
(Insert New Caption)
|
Still stripping... Windshield, bow rail, rub rail and instruments. Steering wheel and all old wiring will go next.
|
|
|
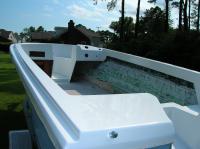
Rub rail, bow rail, fittings, cleats and winshield removed. ready for fiberglass repairs and detailing prior to painting Date:7-15-06
|
(Insert New Caption)
|
|
(Insert New Caption)
|
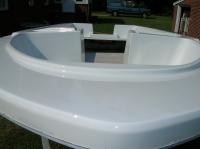
July 22, 2006....Steering wheel and electronics gone!
|
|
|
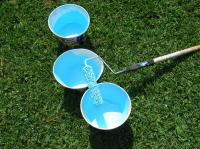
Two part liquid 2 LB expanding urethane foam is poured in between the stringers. Any foam that rises above the top of the stringers is cut off level after it sets. Can be cut off with a hand saw or other saw of choice. Foam is from "US Composites" I think I used 2 16 LB kits.........Definitely a must do in any restoration! Really stiffens up the hull and the boat won't sink!
|
(Insert New Caption)
|
|
(Insert New Caption)
|
The underside and edges of the new plywood floor is wetted out and coated with pigmented fiberglass resin. I colored it so I could see my coverage better.
|
|
|
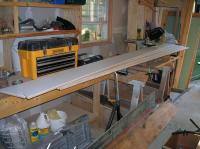
It's a tight squeeze, but got to keep it covered and dry! July, 29, 2006
|
(Insert New Caption)
|
|
(Insert New Caption)
|
July 30-2006
Stringers sanded and back side of floor plywood roughed up at stringer locations. Ready for resin/filler application to tops of stringers and will be screwed down before it sets.
|
|
|
Last piece ready to lay.........
|
(Insert New Caption)
|
|
(Insert New Caption)
|
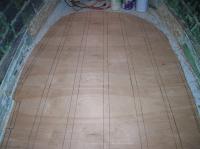
Installed......... 3/4" plywood floor , (11 ply! birch material! , purchased from my neighbor at a great price), down and solid as a rock!
|
|
|
Started to "fair in" the edges of the new floor............
|
(Insert New Caption)
|
|
(Insert New Caption)
|
Floor faired out level and sanded ready to be glassed in.............
|
|
|
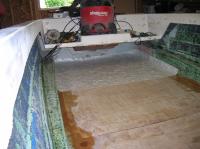
Fiberglass matt material for the floor, ready to be wetted out and applied. 8-12-06
|
(Insert New Caption)
|
|
(Insert New Caption)
|
Floor is glassed in and the top half is almost ready for primer & top coat............
|
|
|
Since the interior is now glassed in and waterproof, the inside of the hull was hosed down and washed out for the first time, to get rid of all the dust etc. from grinding and sanding.
|
(Insert New Caption)
|
|

(Insert New Caption)
|
Motor is in for rebuilding.......New pistons, new drive shaft Etc Etc.
BOAT B reak O ut A nother T on of $$
|
|
|
September 3, 2006.......top side is finally prepped and ready for HMG marine paint, made in England. Epoxy grey primer and white epoxy top coat. (To be applied by spraying out)........Same as "AWLGRIP"
|

(Insert New Caption)
|
|
(Insert New Caption)
|
Grey primer applied....Top coat to go on any time after primer "flash off" (After 30 Min.)
|
|
|
Finally!! Now the hardware and detail work begins......all new cleats, rub rail, bow rail, lights, vinyl covered side panels, seats etc. etc......
|
(Insert New Caption)
|
|
(Insert New Caption)
|
HMG epoxy......Fantastic product! Beautiful finish..........
|
|
|
Paint is dry to the touch after about 45 Min. Two coats primer & two coats white epoxy........4+ hours but worth it.....Would not want to try and brush it or roll it...too much area.......Will apply marine carpet to the inner hull side walls later........
|
(Insert New Caption)
|
|
(Insert New Caption)
|
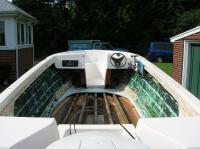
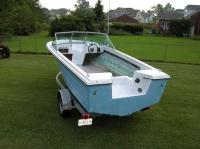
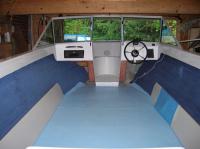
9-10-06 New rub rail, bow light, cleats and windshield now installed
|
|
|
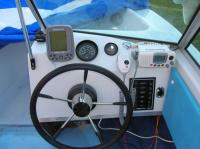
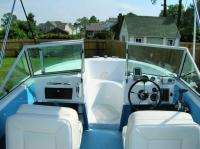
9-10-06 New VHF antenna, new steering wheel, windshield supports, new fuse panel and guages are in........
|
(Insert New Caption)
|
|
(Insert New Caption)
|
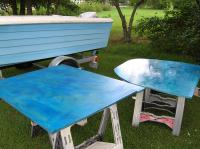
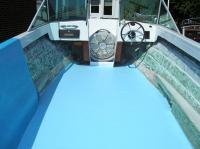
9-27-06 New floor....Applied tinted polyester gel coat by roller. It left a clean, slightly non-slip surface that I was looking for and is relatively inexpensive.
|
|
|
Roller and mixing pots................
|
(Insert New Caption)
|
|
(Insert New Caption)
|
Three months into the project......Side panels cut and 1/8" foam applied, ready for the Naugahide vinyl to be put on. White screw caps to cover the screw heads after attaching the side panels are on order from Pro-Dec Products.
|
|
|
Friday 9-29-06....Marine carpet installed on hull sides, side panels next then seats etc.........Planning on two lounge seats to gain some storage space.....Cockpit panels to be made to enclose bow storage area.
|
(Insert New Caption)
|
|
(Insert New Caption)
|
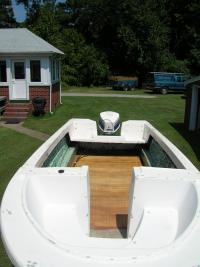
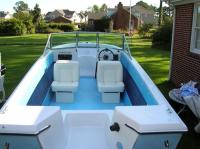
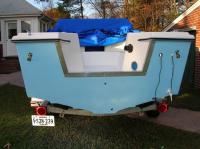
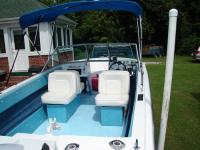
Saturday 9-30-06.......Side panels installed and seats in place......Wife to make cushions for rear seating and bow area.....Seats came from "Boaters World"...Mfgr.."B&M" Nice quality, qreat price and no wood for frames etc. The sun shining on the left side hides the top port panel.
|
|
|
New "Taco" exact replacement transom trim, cut and installed.......
|
(Insert New Caption)
|
|
(Insert New Caption)
|
New matching finished gel coat applied to transom...New speedometer and fish finder cables installed............
|
|
|
November 25, 2006 -- New electronics installed......VHF radio, Eagle fish finder, cell phone charger, fuse block with switches for navigation lights, panel lighting, cockpit lights, horn, bilge pump wired off of two buss bars + & - connected to the battery aft...........
|
(Insert New Caption)
|
|
(Insert New Caption)
|
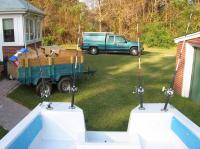
Four rod holders installed aft.........Will add # 5 in middle of stern in front of engine......... Don't mind the trailer.....Cleaning out the attic!
|
|
|
Steering cable and splashwell fitting installed........Ready for the rebuilt Evinrude engine............. January 3, 2007
|
(Insert New Caption)
|
|
(Insert New Caption)
|
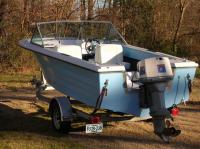
Finally the 1984 Evinrude has been completely rebuilt and is now on the boat and hooked up. Now will need to put in a gas tank and launch for a test drive. February 12, 2007
|
|
|
July 15, 2006....Added a tachometer and AM FM sterio radio located at left side next to glove box. Speakers mounted under dash left and right..........
|
(Insert New Caption)
|
|
(Insert New Caption)
|
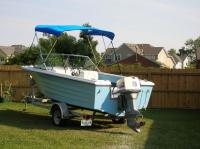
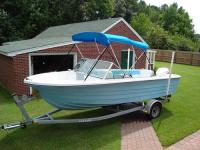
Added bimini top.
|
|
|
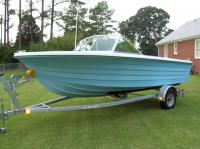
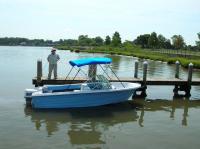
It floats! Runs Great!
|
(Insert New Caption)
|
|
(Insert New Caption)
|
I lowered the bimini top some last year as it was too high.......
|
|
Cleaned up and ready for Chesapeake Bay Striper fishing _ Starts Oct 4, 2009.....Just add water and some poles !!
|
(Insert New Caption)
|
|